Composr Tutorial: Themeing your site
 Your website's entire appearance, from its layout, to its images, and color schemes all make up a 'theme'. These themes are completely customizable by you, given a moderate knowledge of HTML5 (HyperText Markup Language) and CSS (Cascading Style Sheets).
Table of contents
Technical structure
The three major components (aside from images) are the HTML, CSS, and JavaScript of your website. HTML controls most of the layout of your page, while CSS is responsible for the look of your site (including colour schemes and border styles), and JavaScript defines interactive functionality.The CSS and JavaScript is edited much like any typical website's CSS would be. Composr has CSS and JavaScript split up into a number of files, but other than that there is little that makes it different than any website's CSS. Well, there's Tempcode too, but you don't need an understanding of that for making basic changes.
The HTML is a different matter. Composr's HTML is split up into small sections, called "templates". These templates have several advantages:
- First, splitting large complex pages down to individual templates allow those templates to be re-used, meaning there is less code to be maintained. It also allows sections of code that are repeated often to only be written in one place. This makes updating and maintaining your HTML a lot easier
- Second, we believe this makes editing an easier process. Instead of loading up an entire website to find the proper HTML to edit, one can simply call up a template, which is typically between 2 and 20 lines long. This means if you want to edit a specific section, you can load the template for that section and only have to work within that template
At this time, there are over 1,000 templates that make up Composr and all of its addons. This may seem like a daunting number at first, but usually you'll find that you only need to edit a few of the major ones to achieve a new overall look that you desire.
Important – don't confuse the word template
 Some people use the word template to refer to a downloadable generic static website that can be customised into a real final site.
When we use the word template in Composr we do not mean this, we strictly mean an individual component file that gets composed together with other templates to build the output.
When we use the term template we are either talking about specifically HTML templates, or any theme template (HTML, CSS, JavaScript, XML, text). It's usually specifically HTML templates except inside the template editor. CSS/JavaScript/XML/Text templates tend to be named "CSS/JavaScript/XML/Text files" outside of the template editor, as that's a bit more intuitive to people.
Template editing, or page editing?
Before you edit your templates, you need to know which template you're going to edit. It's also important to know if you actually want to edit a template in the first place. In many cases, the page is built up using Comcode, in which case you would edit the page simply by clicking the "edit this page" link at the bottom of the page.An example of this is the front page in the Welcome zone. If, for example you wanted to edit the 'poll' section, you simply click the "Edit this page" link at the bottom of the page. This takes you directly to an "Edit Comcode page" screen, where you can edit any element of that page. Knowing the difference between Comcode pages and pages that use templates is sometimes difficult. The general rule of thumb is that if there's an "edit this page" link at the bottom of the page, try it first to see if you can edit what you want. If not, you'll need to determine which template you need to edit.
Cheating: the Theme Wizard (maintenance status)
The Theme Wizard
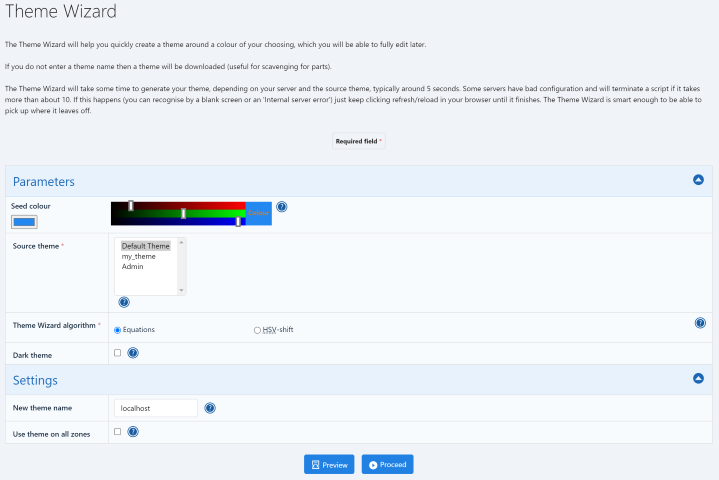
(Click to enlarge)
Be aware of the following small deficiencies:
- Dark mode themes (maintenance status) are usually not tested as thoroughly since the default theme is a light theme.
- Some default software emoticons are animated, and attractive animated images have to be saved to a particular background colour -- so you may wish to uninstall these animated emoticons or rework them in an image editor.
- If you use extreme light/dark seeds (maintenance status) (bright seeds on a light theme or dark seeds on a dark theme), some elements may turn out hard to see. There is no easy way to fix this using automated methods, therefore you may have to do some manual adjustments. It's always good to preview on the Theme Wizard before you proceed.
The Theme Wizard is available at Admin Zone > Style > Themes > Theme Wizard.
A 'Logo Wizard' is provided that will create you very simple site logos (the logos in the top-left of your website). It is recommended that you use this tool to create your initial logo and consider making your own customized logo at a later point.
Making a new theme manually
Good design
When making your own theme, you need to be aware of several things. Firstly, it is good to have a general idea of what you're going to do before you dive into making changes. This way you can hopefully maintain a more consistent look across your website, and avoid a lot of repeated work. When making a new theme, it is wise to put good design tactics to use before beginning your work. These include:
- Maintaining a consistent look across your pages
- Avoid "busy", cramped looking pages -- allow room for your viewer to 'breathe'. Padding is an excellent way to accomplish this
- Visual flow: make certain your use of headings and other large/small sections are appropriate to help direct the viewer's eye to the most important information
- Colour schemes: Pick a colour scheme, and try to stick with it. Don't use different colours for every class in the CSS file -- your colours will only end up conflicting and looking ugly
- On the other hand, colours that contrast in a good way are encouraged. If you are able to pick multiple colours (usually not more than two: a primary and a secondary / accent) that compliment each other, it is wise to use these. This will allow you to separate important content through use of a colour variation
Technical aspect
The link to add a theme
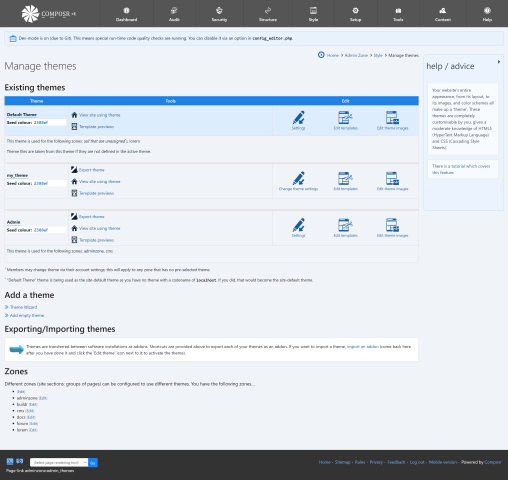
(Click to enlarge)
Click the "Add empty theme" link at the bottom. This will bring you to a screen prompting you for a name for this new theme, an option to apply it as the default theme across all of your zones, as well as other options. It is advisable to not tick (check) the 'use as default on all zones' option until you've styled your new theme to your liking, unless your website is closed to the public anyway. If your website is currently open and you want to make sure that no other members may even manually select your new theme until you are ready, you may set permissions for it.
At this point, Composr will make a set of empty folders for this new theme, and you may begin editing it. You will be prompted to edit this theme's templates, CSS, images, or be taken back to a main page.
It is recommended that at this point you go to edit your account settings and switch over to your new theme, so that you can see changes as you make them.
Template editor
The template editor is an all-encompassing editor for:- CSS templates (.css, themes/mytheme/css[_custom] directories)
- HTML templates (.tpl, themes/mytheme/templates[_custom] directories)
- JavaScript templates (.js, themes/mytheme/javascript[_custom] directories)
- XML templates (.xml, themes/mytheme/xml[_custom] directories)
- Text templates (.txt, themes/mytheme/text[_custom] directories)
- Comcode pages (.txt, zone's pages/comcode[_custom] directories)
Comcode pages aren't theme files but we allow them to be edited within the template editor for convenience. They will be edited as raw code rather than via a WYSIWYG editor. It is very handy to be able to hand-code HTML for Comcode pages directly alongside your templates.
Page rendering tools in the footer
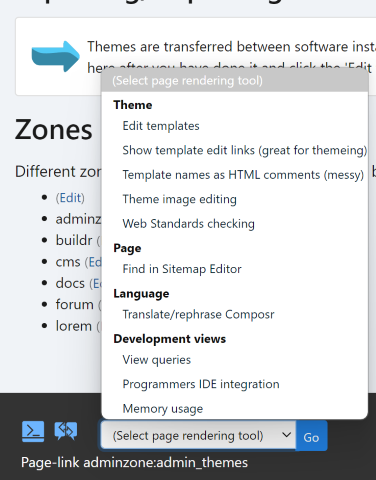
(Click to enlarge)
- From Admin Zone > Style > Themes (for a particular theme). This will open up a default set of common files.
- From the "Page rendering tools" at the bottom of any screen (for the active theme, and assuming those tools were not removed in that theme). This will open up most of the files relating to the screen you are on.
Opening via the "page rendering tools" is incredibly powerful, as it opens the editor in a new window and forms an "anchor" to the page you opened it from: you will see automatic live previews of changes to CSS, and dynamic highlighting of how the page relates to what you're editing.
The template editor is very powerful. Features include:
- Tabbed interface for editing multiple files at once
- Dynamically open and close files
- Save changes without having to navigate away
- Browse for files within the selection tree using a number of different mechanisms:
- By template type
- By addon
- By co-occurrence (i.e. find templates that tend to come together with another particular template)
- By screen (templates used on particular screens -- which only lists screens if you've either enabled the "Grow template meta-tree" configuration option (Admin Zone > Setup > Configuration > Performance options > Data gathering) and browsed to that screen, or previously opened the template editor directly from that screen)
- See key details about any file in the selection tree
Editing an HTML template in the template editor
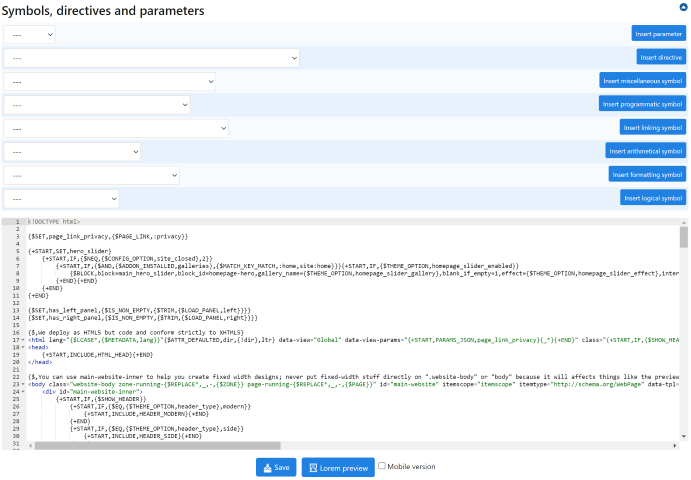
(Click to enlarge)
- Tools for helping to code HTML templates:
- Insert parameters used within the template
- Insert common Tempcode
- Preview the template with the appropriate bundled screen preview, which uses Lorem Ipsum text (see the "Screen previews" section)
- Dynamic mode, if opened from a page ("anchor page"):
- The instantiations on the anchor page of the template you are currently editing (i.e. the active tab) will glow
- Find different GUIDs used with the template (advanced)
- Tools for helping to code CSS templates:
- CSS equation helper, to help test Theme Wizard-friendly equations
- Build in reference guide links
- Dynamic mode, if opened from a page ("anchor page"):
- Show selectors used on the anchor page
- If you hover the selector, it highlights its usage on the anchor page
- If you click the selector, it finds it in the code
- If you move the mouse around the anchor page, it highlights selectors that apply to that area
- Live preview of changes (saved or not) on any URL, in either desktop or mobile mode
- Restore old revisions of pages, and scan the differences visually
- Resize the editing window and panes for comfort
- Show related templates for any open template tab
Specific guidance for CSS templates
Editing a CSS file in the template editor
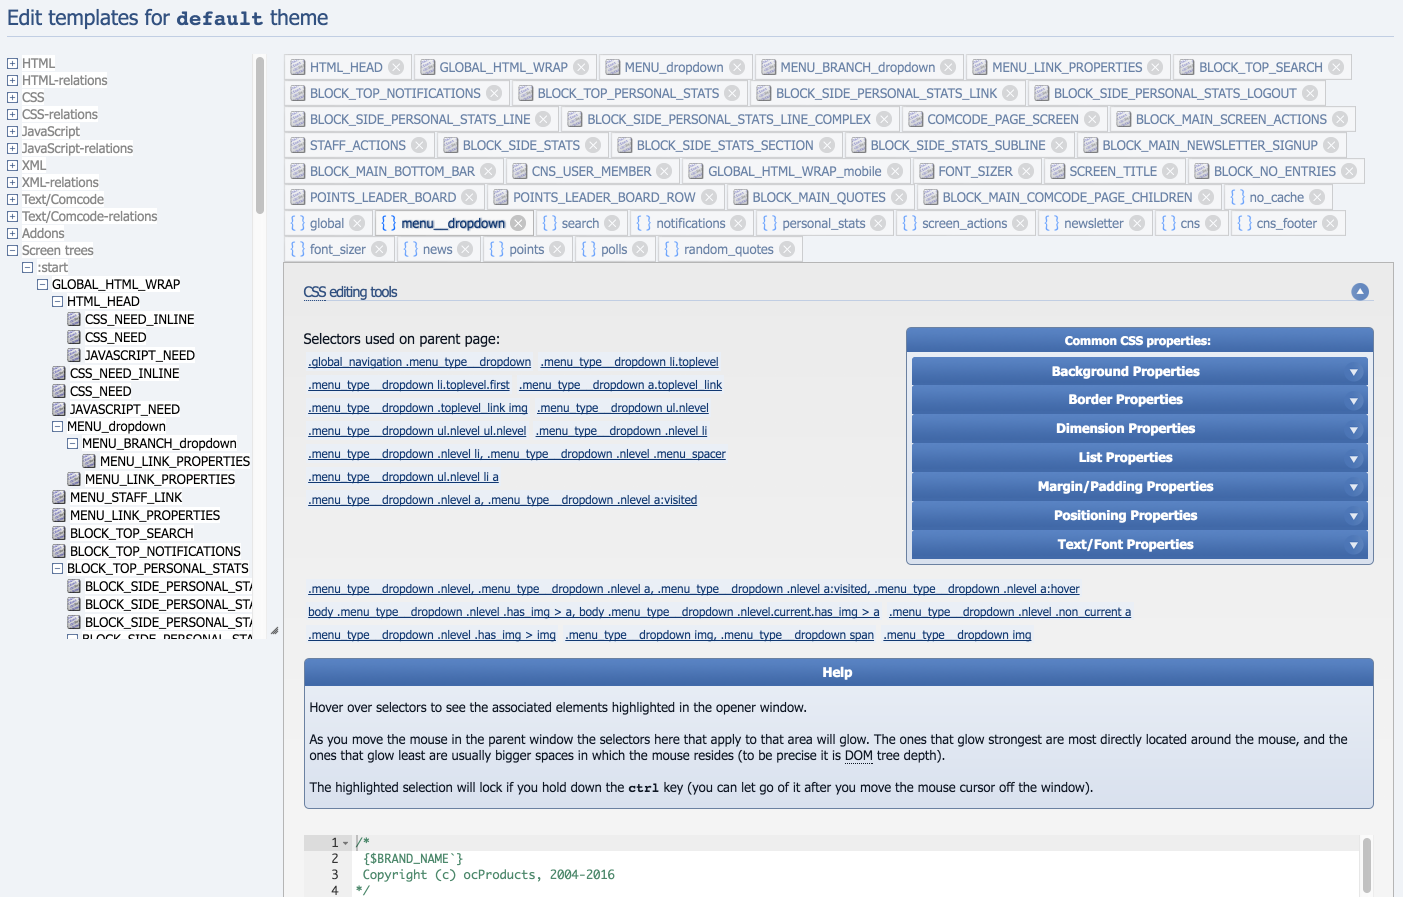
(Click to enlarge)
- _base.css: This file contains the responsive design break points and some settings
- _colours.css: This file contains the colours for the theme
- global.css: This file contains most of the classes used throughout Composr. This is the file you'll be editing most of the time
- no_cache.css: These are classes that make use of Tempcode (for example, checking what browser is being used) to vary the style of the class
- cns.css: These are a set of classes that are used within Conversr
Here's a sample CSS change for global.css…
Adding:
Code (CSS)
font-style: italic;
}
Overriding CSS files into your theme
The ideal way to edit CSS in Composr is not to completely override CSS files with a modified version of the file, but rather to create an override that includes the original file and then makes changes after it.This requires a bit more technical skill but it makes upgrading much easier.
For example, you could override calendar.css:
Code
{+START,INCLUDE,calendar,.css,css,default,1}
   REMOVE_SELECTOR: .calendar-month-day
   REMOVE_SELECTOR_PROPERTY: .event-listing-col-2 ~~> width
   STR_REPLACE: border: 1px ~~> border: 2px
{+END}

.calendar-month th {
   font-size: 1.0em;
   color: green;
}
This would:
- Include the original calendar.css
- … with the whole .calendar-month-day CSS selector removed (the Tempcode INCLUDE symbol has some special syntax for making changes to included files)
- … with the .event-listing-col-2 width property removed (")
- … with 1px borders replaced with 2px borders (")
- Change the font-size property from 0.9em in the original file to 1.0em. This works on the basis of CSS coming later in the CSS file having higher precedence.
- Add a color property which is not on the original CSS.
Tempcode in CSS files
If you get confused by Composr's use of Tempcode within the CSS you are free to strip and replace it with pure CSS as you go. The Tempcode is used for the Theme Wizard, to make maintenance a bit easier, and to tie into the theme configuration options -- but you don't really have any particular personal incentive to maintain that.Debugging
If you find the CSS totally "corrupts", it is likely you have made a typo somewhere. For example, failing to close a comment.You can't effectively check the Composr CSS because it has lots of Tempcode in it. Additionally, the normal outputted CSS is minified, so hard to read and relate to.
Fortunately there is a solution. If you go to http://yourbaseurl/index.php?keep_minify=0 then the CSS will not be minified. You may then look at your HTML source, locate the URL to your CSS, and then pass this onto a regular CSS validator.
Equations
Some CSS files have {\$THEMEWIZARD_COLOR,#RRGGBB,name,equation} lines near the top, mainly _colours.css.When the Theme Wizard runs the first parameter (the colour) of the THEMEWIZARD_COLOR line is regenerated from the third parameter (the equation) by running through the calculation logic of the Theme Wizard.
For example,
Code
{$THEMEWIZARD_COLOR,#426aa9,box_title_background,100% seed}
Code
{$THEMEWIZARD_COLOR,#ff0000,box_title_background,100% seed}
This is all happening only when the Theme Wizard is run.
There is a special case for these particular equations in _colours.css only:
Code
{$THEMEWIZARD_COLOR,#94979d,seed,100% 426aa9}
{$THEMEWIZARD_COLOR,#ffffff,WB,100% FFFFFF}
{$THEMEWIZARD_COLOR,#000000,BW,100% 000000}
When the CSS file is compiled, it works as a simple variable system. The second parameter serves as the variable name, which can then be referenced in the CSS as {\$GET,name}. It's a very straight-forward substitution system.
You can if you wish just bypass the Theme Wizard equations system and directly enter your own CSS colour codes in place or in addition to what the Theme Wizard is doing. You are in no way tied into the mechanism of the Theme Wizard once you begin editing your own theme. That said, it can be useful to help you keep your colour palette consistent.
The following are examples of Theme Wizard equations that may be used:
| Equation | Purpose | Examples |
|---|---|---|
| (hexadecimal colour without the #) | You can define or combine a specific colour with other operations |
Code (CSS){$THEMEWIZARD_COLOR,#426aa9,seed,100% 426aa9} /* Uses #426aa9 as the colour */ {$THEMEWIZARD_COLOR,#808080,gray,50% FFFFFF + 50% 000000} /* Combines white and black equally, resulting in gray */ {$THEMEWIZARD_COLOR,#8C8C8C,brighter_gray,90% gray + 10% FFFFFF} /* Takes 90% of the gray colour and adds 10% white to it */ |
| Colour name | You can use other colours in your equation |
Code (CSS){$THEMEWIZARD_COLOR,#FFFFFF,seed,100% FFFFFF} /* Uses #FFFFFF as the colour */ {$THEMEWIZARD_COLOR,#808080,dark_seed,50% seed + 50% 000000} /* Takes 50% seed colour and adds 50% black, making it darker */ {$THEMEWIZARD_COLOR,#F2F2F2,slightly_darker_seed,90% seed + 10% dark_seed} /* Takes 90% of seed and 10% of dark_seed, making for a slightly darker seed */ |
| % | Define how much influence of a colour to use in the equation (note that equations must all contain an influence percent, or you will get an error) |
Code (CSS){$THEMEWIZARD_COLOR,#426aa9,seed,100% 426aa9} /* Uses 100% of #426aa9, which is #426aa9 */ {$THEMEWIZARD_COLOR,#800080,dark_purple,50% FF0000 + 50% 0000FF} /* Combines 50% each of red and blue, resulting in dark purple */ |
| + | Combine (pivot) equations together |
Code (CSS){$THEMEWIZARD_COLOR,#800080,dark_purple,50% FF0000 + 50% 0000FF} /* Combines 50% each of red and blue, resulting in dark purple */ |
| - | Remove (pivot) a colour |
Code (CSS){$THEMEWIZARD_COLOR,#ffff80,aqua_green,100% FFFFFF - 50% 0000FF} /* Remove 50% blue from white, resulting in aqua green */ |
| sat_to | Sets the saturation % of a colour |
Code (CSS){$THEMEWIZARD_COLOR,#FF8080,pastel_red,100% (seed sat_to 50)} /* Sets the saturation of seed to 50%, and use 100% of that colour */ {$THEMEWIZARD_COLOR,#e3f0fd,fixed_width_background,11% (seed sat_to 100) + 89% WB} /* Uses 11% of the seed colour with 100% saturation, and adds 89% WB colour */ |
| sat_add | Adjusts the saturation of a colour (using 0 - 255) |
Code (CSS){$THEMEWIZARD_COLOR,#FF8080,more_sat_seed,100% (seed sat_add 128)} /* Uses seed colour with +128 (~50%) saturation */ {$THEMEWIZARD_COLOR,#FFFFFF,less_sat_seed,100% (seed sat_add -64)} /* Uses seed colour with saturation decreased by 64 points (~25%) */ |
| sat | Adjusts the saturation of a colour (using %) |
Code (CSS){$THEMEWIZARD_COLOR,#FF8080,more_sat_seed,100% (seed sat 50)} /* Uses seed colour with +50% saturation */ {$THEMEWIZARD_COLOR,#FFFFFF,less_sat_seed,100% (seed sat -25)} /* Uses seed colour with saturation decreased by 25% */ |
| val_to | Sets the value % of a colour |
Code (CSS){$THEMEWIZARD_COLOR,#808080,darker_seed,100% (seed val_to 50)} /* Sets the value of seed to 50% */ {$THEMEWIZARD_COLOR,#6da4de,area_light_background,65% (seed val_to 80) + 35% WB} /* Uses 65% of the seed colour with 80% value, and adds 35% WB colour */ |
| val_add | Adjusts the value of a colour (using 0 - 255) |
Code (CSS){$THEMEWIZARD_COLOR,#FFFFFF,lighter_seed,100% (seed val_add 128)} /* Uses seed colour with +128 (~50%) value (does nothing for a white seed) */ {$THEMEWIZARD_COLOR,#BFBFBF,darker_seed,100% (seed val_add -64)} /* Uses seed colour with value decreased by 64 points (~25%) */ |
| val | Adjusts the value of a colour (using %) |
Code (CSS){$THEMEWIZARD_COLOR,#FFFFFF,lighter_seed,100% (seed val 50)} /* Uses seed colour with +50% value (does nothing for a white seed) */ {$THEMEWIZARD_COLOR,#BFBFBF,darker_seed,100% (seed val -25)} /* Uses seed colour with value decreased by 25% */ |
| hue_to | Sets the hue % of a colour (% of rotation on the hue colour wheel) |
Code (CSS){$THEMEWIZARD_COLOR,#FFFFFF,hue_seed,100% (seed hue_to 50)} /* Sets the hue of seed to 50%, or 180 degrees */ {$THEMEWIZARD_COLOR,#f3e0e4,required_background,60% (area_4_background hue_to 0) + 40% area_background} /* Uses 60% of area_4_background with a hue of 0% (red), plus 40% of area_background */ |
| hue_add | Adjusts the hue of a colour (using 0 - 255, not degrees!) |
Code (CSS){$THEMEWIZARD_COLOR,#FFFFFF,hue_change_seed,100% (seed hue_add 128)} /* Uses seed colour with +128 (~50% / 180 degrees clockwise) hue (does nothing for a white seed) */ {$THEMEWIZARD_COLOR,#FFFFFF,hue_change2_seed,100% (seed hue_add -64)} /* Uses seed colour with hue decreased by 64 points (~25% / 90 degrees counter-clockwise) (does nothing for a white seed) */ |
| hue | Adjusts the hue of a colour (using %) |
Code (CSS){$THEMEWIZARD_COLOR,#FFFFFF,hue_change_seed,100% (seed hue 50)} /* Uses seed colour with hue rotated +50% / 180 degrees clockwise (does nothing for a white seed) */ {$THEMEWIZARD_COLOR,#FFFFFF,hue_change2_seed,100% (seed hue -25)} /* Uses seed colour with hue rotated by 25% / 90 degrees counter-clockwise (does nothing for a white seed) */ |
| shift | Shifts the RGB values |
Code (CSS){$THEMEWIZARD_COLOR,#0000FF,red_to_blue,100% (FF0000 shift 0)} /* Shifts the RGB values to the left (RGB to GBR) */ {$THEMEWIZARD_COLOR,#00FF00,red_to_green,100% (FF0000 shift 1)} /* Shifts the RGB values to the right (RGB to BRG) */ |
| contrast | Finds a suitable colour with the provided contrast ratio (if it does not succeed, will use either white or black instead); this is a handy tool for accessibility compliance |
Code (CSS){$THEMEWIZARD_COLOR,#595959,contrast_seed,100% (seed contrast 7)} /* Use a colour with a contrast ratio of 7 compared to seed */ {$THEMEWIZARD_COLOR,#000000,contrast_seed,100% (seed contrast 0)} /* Special case: Uses either black or white, whichever has the greatest luminance difference from the provided colour (does not actually use contrast ratios) */ |
CSS prefixing
Some browsers experiment with new CSS properties using prefixes. More details are explained here: https://www.thoughtco.com/css-vendor-prefixes-3466867.In Composr we use {\$BETA_CSS_PROPERTY,property: value;} to automatically add prefixing to a property, or make other changes to make a property work across different web browsers.
Of course doing this risks relying on browser CSS behaviour that may be buggy or subject to change. By passing it through BETA_CSS_PROPERTY in a consistent way we can actually change the output across Composr patch releases, if browsers change their syntax -- so it's a nice little solution we have here.
Other notes about CSS conventions
Some additional comments are made available at the top of global.css.Screen previews
For templates of bundled functionality, the template editor will show a 'Lorem Preview' button. The button invokes the screen preview that covers the particular template, but incorporating any live changes you're making in the editor. The screen previews are a Lorem Ipsum sandbox that works regardless of the content on the actual website.It's a very useful feature.
You can also access all the screen previews by name, from Admin Zone > Style > Manage themes > Screen previews (for a theme).
Identifying what templates are what
You can take a number of different approaches to working out what templates to edit:- Open the template editor from the page rendering tools, and work out which of the dozen of so templates that opened, relates to what parts of the screen. The area(s) of the anchor page that is used for the open template tab will likely glow.
- Analyse the Composr code (PHP developers only).
- Only edit a few main templates like GLOBAL_HTML_WRAP.tpl (if you are a novice it's best to keep it simple).
- Use the "Template names as HTML comments" page rendering tool (requires viewing of the HTML source).
- Use the "Show template edit links" page rendering tool (will be a bit chaotic, but basically works).
- Search the raw on-disk files for HTML that is probably unique within a particular template.
'1' is usually the best option, but as we recognise there is a lot going on within Composr, we make multiple techniques available to you.
The "Template names as HTML comments" HTML comments look something like this…
Understanding Templates Code (Tempcode)
There are many sections of code in your templates that you'll need to be aware of in order to be effective in your editing. The code is written in our templating language, which is known as Tempcode. For more information see the Tempcode programming tutorial.Hand-editing (advanced)
You may notice that the HTML templates are stored on disk in the themes/default/templates folder, and that overrides go into the templates_custom for a particular theme.This is intentional -- the only templates that will be copied into your themes/mytheme/templates_custom folder are ones that you've actually made changes to. Everything else is just left in the themes/default/templates folder. This is to cut down on the amount of files you need to keep track of.
The exact same thing applies for css, javascript, text and xml.
It is permissible to hand-copy files into your theme's templates_custom) and hand-edit them outside Composr. Composr typically will automatically detect that you've changed them because the file modification dates will have changed (unless you've turned this feature off for performance reasons).
There's even a special dynamic "meta-tree" system of symbolic links that provide a file-system equivalent to the template browser within the template editor. For example, you can find symbolic links to all the templates that are used on a particular screen. This is very useful for developers who host on their own machines and like to edit within their standard text editor, alongside the PHP code they are editing.
Theme images
An image used by a Composr theme (including the default theme) is called a "theme image"; this is basically every image that isn't a part of content (gallery images, banners, etc, would be content). There's a whole system for dealing with theme images.Naming convention
Theme image codenames are mapped to URLs via a database table, but initially they are auto-detected from a very simple naming convention…themes/mytheme/images_custom/foo/bar.png would be the foo/bar theme image and could be referenced by this Tempcode in templates or CSS files: {\$IMG,<foo/bar>} (without the angle brackets).
Composr searches under your theme's images_custom and images folders for matches, and if it can't find one it will fallback to searching the default theme's images_custom and images folders.
All the following file extensions are recognised, in precedence order:
- png
- jpg
- jpe
- jpeg
- gif
- ico
- cur
- svg
- webp
- bmp (this is not recommended)
Don't have multiple files with the same base name but different file extensions as only the highest-precedence one will ever be used.
Once the correct URL has been detected, the database table is updated. This is basically a cache and can be cleared out from Admin Zone > Tools > Cleanup Tools.
Editing theme images
The "edit theme image" form
(Click to enlarge)
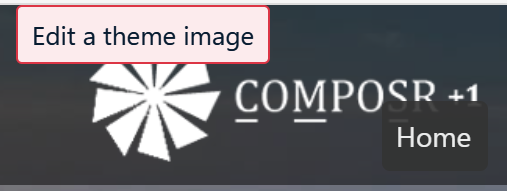
The "edit theme image" button appears after hovering some images for a few seconds
(Click to enlarge)
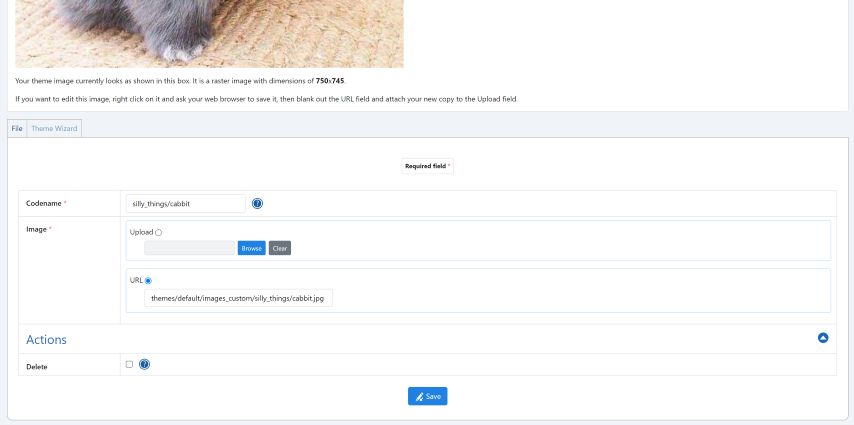
Alternatively, for many images (larger ones using <img> tags) you can get straight to their editing screen by hovering the mouse over the image and clicking the "Edit theme image" button that appears (see screenshot).
On the edit theme image screen, you are shown the current version of this image in the top. You also have the opportunity to edit this image's name, location, or to upload a new image in its place.
Manually
 If you prefer to edit files directly using something like FTP you may do this too.
However, if the theme image is currently only in the default theme you'll need to copy it to your theme's images_custom folder first, then edit the theme image cache from Admin Zone > Tools > Cleanup Tools.
If you delete a file with one extension then add a file with the same theme image codename but another extension, the theme image cache will also need clearing from Admin Zone > Tools > Cleanup Tools.
Deleting theme images
You can delete a theme image from the bottom of its edit form, if it's not a default theme image.Adding theme images
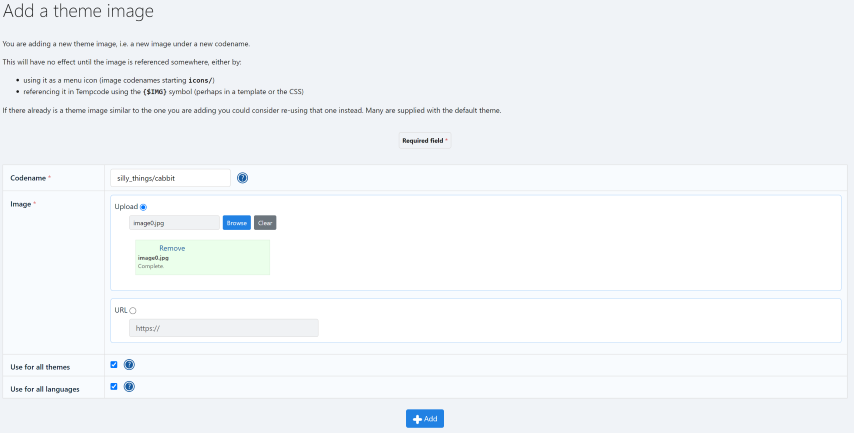
To add a theme image, go to Admin Zone > Style > Themes, then choose the "Edit theme images" icon for the theme of your choice, as before. There is a button at the bottom, "Add theme image", which will take you to a screen allowing you to create a new theme image.You need to fill these fields:
- Name: You can call this whatever you like, but we recommend putting in something based on the image's pathname. For example, the "sortablefield_asc" image in the folder themes/mytheme/images/results, is currently titled results/sortablefield_asc. This makes it easy to tell on first glance which folder an image is in, which in turn usually determines what group of images it belongs in.
- Upload or URL: Choose one of these options to upload your image to your website. Use the upload field for files that currently exist on your computer, or use the URL option for an image that is already online somewhere.
- Use for all themes…
- If you are adding a theme image that is only relevant to your new theme: you should not tick (check) this. For example, an image that is only referenced by one of your customised templates.
- If you are adding a theme image that potentially could be used by any theme: you should tick (check) this. For example, an image used on one of your menus (you can add such images by adding them with image codes that start icons/).
The add theme image form
(Click to enlarge)
Finding the "add theme image" button
(Click to enlarge)
- Find or make a suitable image for your website. If you want to add a new background pattern for your website then you can find a suitable one from a public domain/creative commons tile graphic for your website.
For this example we'll use this background. Download this file. - Go to Admin Zone > Style > Themes > Edit theme images (against your own theme).
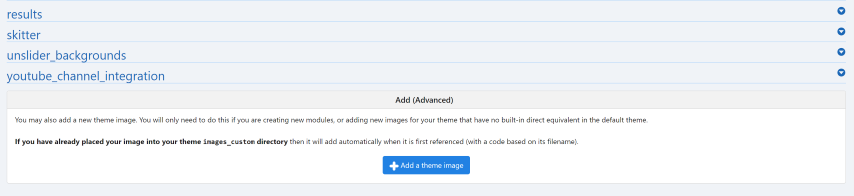
- Select the "Add theme image" button at the bottom of the screen, which will direct you to the add theme image form.
- Fill the Codename for the image. For this example we'll use new_background.
- Browse for the image file under the Image field.
- Submit the form via the "Add theme image" button.
- To apply the uploaded image to your website theme, you have to edit the CSS file.
Go to Admin Zone > Style > Themes > Edit templates (against your own theme). - Select the global.css file to edit (actually it's selected by default), and click the "Edit" button.
Image Our change in action

(Click to enlarge)
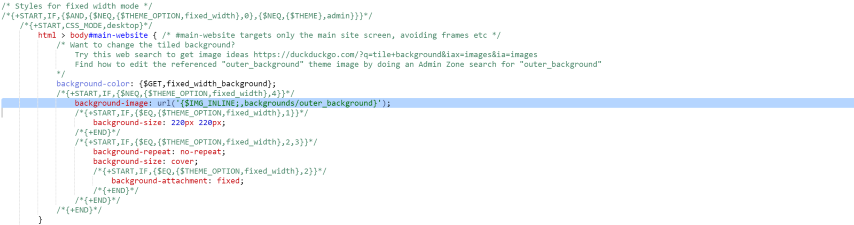
Image Edited CSS

(Click to enlarge)
Image Searching the CSS
(Click to enlarge)
- Find background: url('{$IMG_INLINE;,outer_background}'); using either the browser's find feature or the find feature in the editor bar.
- Change background: url('{$IMG_INLINE;,outer_background}'); to background: url('{$IMG_INLINE;,new_background}'); (our new theme image).

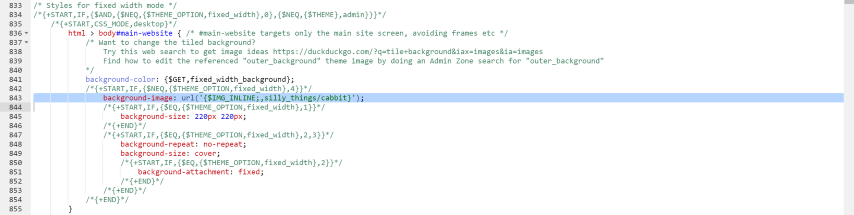
(a more sane option would have been to directly edit the outer_background theme image, but I wanted to give a simple example of a new theme image while doing only minimal CSS editing)
Manually
You can add new theme images using something like FTP by saving them directly into themes/mytheme/images or themes/default/images_custom, using subdirectories where appropriate (the path forms part of the theme image codename, see "Naming convention"). You should never save into themes/default/images though, or make changes to those files directly, because this directory 'belongs' to Composr itself.Deleting themes
You can delete a theme from the bottom of its edit form.SVG Sprites
If the SVG sprites is on (under Admin Zone > Setup > Configuration > Theme options > Icons) then icons will be accessed via a compiled SVG sprite. This may improve performance by reducing the number of HTTP requests required, at the cost of a monolithic large sprite file being downloaded to users. It is not enabled by default as the tradeoff will not be worthwhile for everyone, and SVG sprites add some extra complexity.The sprite file comes out-of-the-box and is automatically re-compiled as addons are installed/uninstalled. You can manually recompile it from Admin Zone > Style > SVG sprites, if you have changed any of the icons manually.
Tips
- Do not use a custom theme on the Admin Zone or CMS zone. It's not necessary and would make you have to consider all kinds of extra details
- Uninstall any non-required addons, so you don't have to test your new theme on so many screens. It is a huge decrease in the burden of themeing
- The web developer tools in modern web browsers are incredibly handy in analysing how the Composr CSS interacts with the HTML. You can use them to run all kinds of tests, and quickly get a handle on how things are built.
- Read up on CSS and HTML generally. If you are going beyond simple themeing you'll need to understand the complex aspects of these technologies, and they aren't always simple. Composr is entirely built on web standards, and thus can be reformulated using them. The web standards are supplemented with Tempcode and glued together with the structure Composr provides (see below)
- Try and think structurally. Remember that your layout is going to be best composed using standard Composr features, like panels, menus, blocks, Custom Comcode tags, pages, and Comcode/Tempcode includes. You can bend all these far beyond the default settings (e.g. a panel can be placed anywhere and be any shape), so don't feel like you're constrained by them -- they are a tool for you to manage your site once it is finished
- Make good use of the template tree if you're not sure what templates are being used on a screen. Alternatively use the template search feature (available on the screen where you choose a template to edit)
- If you are choosing a template to edit manually from the full list but you know the name of the template, you can quickly get to it by typing rather than scrolling. Just click one of the entries in the list, and then type "dash-space-template-name", and most browsers will jump straight to it
- Remember to test how your e-mails look as well as your screens
- The font-size changer assumes you will use em-based (i.e. relative) sizing for all styles. The font sizer works by setting a larger base font size. The default theme sizes almost everything relatively (using em), so a larger base font size has an effect that cascades through everything. If you change styles to pt or px then that is absolute and hence the cascade will be stopped at that point.
- Don't forget to make a favicon
- Don't forget to consider how your website looks when printed
- If you want to exhaustively test your theme for third-party use, the screen previews feature will really help
- If you are more comfortable copying individual files and editing them within your favourite text editor, this may well be a better approach than using the inbuilt template and CSS editors -- especially if you are a developer
- If you get stuck or make a mistake, don't feel bad -- this happens to the best developers too
Many more tips and points of guidance are included in the Designer themes, implementing a clean-room design tutorial.
Copying themes
You may copy themes between sites, or duplicate them, but make sure you empty the template cache before using a copied theme. The cache files hard-code file paths, URL paths, and the theme name.Concepts
- Theme
- Your theme is the sum of your CSS, images, and templates, which work together to create the style and layout for your site.
- CSS
- Your CSS is the element of your theme that specifically controls the colours and styles on your site, and has limited layout functionality
- Templates
- The templates on your site are individual HTML files that chain together to create the final HTML used on your site.
- Images
- Images are used throughout your site, in the form of buttons, backgrounds, emoticons, and more.
- Tempcode
- Tempcode is a set of symbols, parameters, and directives to help you edit your templates. These include the $IMG symbol.
Limitations of multiple themes (advanced)
There are a couple of limitations if you wish to run multiple themes at once:- When Comcode is compiled, it is compiled against the active theme. So don't try and customise Comcode templates differently for different themes as it will be 'arbitrary' which template is shown to an end-user.
- When e-mails are sent to multiple recipients at once, or unknown recipients, it will use the site's default configured theme (it won't separately style things for each individual recipient). The theme affects the MAIL template chosen, the theme images used, and the CSS. Note that it is very rare for Composr to actually mail multiple recipients at once, because the notification system itself generates e-mails separately for each member being e-mailed.
See also
- Guide to web technologies (including HTML, CSS, and JavaScript)
- Designer themes, implementing a clean-room design
- Mobile design
- Tempcode programming
- Releasing a theme
- Theme Lifecycle
- Composr site structure
- Making a new theme
- Using Chrome development tools to help with themeing
- Helping improve site accessibility for disabled users
Feedback
Have a suggestion? Report an issue on the tracker.