Composr Tutorial: Running a newsletter
Written by Chris Graham
Composr has an inbuilt e-mail newsletter system which will allow you to send out newsletters to subscribers and your members.You can use a newsletter to keep your users informed of news (for instance, those who do not check the site regularly).
Think carefully about how you wish to mix news, forum announcements or forum news, and newsletters for your site: in particular, you may wish to post more news than you send newsletters, or post to both news and newsletters, because news stays on your site in a permanent archive. You may also wish to prepare and use the same content for news as you do newsletters, so as to present a common message.
Basic targeting
Newsletters vs Memberships
Newsletter subscription is distinct from membership, in that a subscription is solely tied to an e-mail address, and there is no formal tie between a subscription and a member account, and vice versa. This said, the newsletter system has special support for sending out newsletters to usergroup members (Conversr-only) regardless of whether they have specifically subscribed to a newsletter.A count will be given, counting all targetable members in the usergroup. Targetable means the following criteria need to be true for the member:
- validated
- not banned
- allows staff e-mails (unless the "Allow members to opt-out of staff e-mails" option is not enabled)
- has a configured e-mail address
- has not unsubscribed through the global unsubscribe endpoint at data/unsubscribe.php
If you only ever e-mail members, it is better to ask them to join target usergroups rather than target newsletters. i.e. You may be best off never asking users to join a newsletter directly.
Multiple newsletters
You may have multiple newsletters in Composr. This allows you to set different subscription areas, or a way to allow people to subscribe to different traffic levels.Newsletter signup
Subscribing to the newsletter via the maintenance module
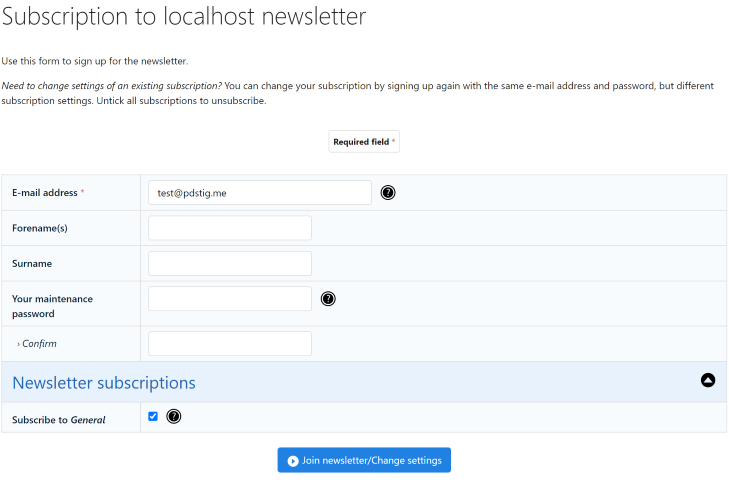
(Click to enlarge)
You will typically invite people to join the newsletter via the main_newsletter_signup block. They will be assigned a randomised maintenance password.
You can also have people signup directly via the site:newsletter module ("maintenance module", About > Newsletter on the default menus). They will choose their maintenance password.
The newsletter process has a mandatory e-mail confirmation step so as to stop people signing up others to the newsletter, which may be illegal in some jurisdictions and is at least a nuisance. This confirmation e-mail is driven by the NEWSLETTER_SIGNUP_TEXT language string.
The exception is the main_newsletter_signup, which has an option to instead send a customised e-mail that does not itself require any click-through.
When a user hits the block and subscribes through it, one of the following situations will happen:
- A new subscription – Composr will sign them up and send a confirmation e-mail
- An existing subscription never confirmed – Composr will treat this as a refresh to a new subscription, re-sending the confirmation e-mail
- An existing subscription – Composr will show an error
The maintenance module is a bit richer:
- A new subscription – Composr will sign them up and send a confirmation e-mail
- An existing subscription never confirmed – Composr will treat this as a refresh to a new subscription, re-sending the confirmation e-mail (regardless of what password was entered)
- An existing subscription, with the wrong maintenance password – Composr will give an error (with an option to re-set the password), unless you are logged in with a privileged account
- An existing subscription, with the correct maintenance password – Composr will update the newsletter subscription
The block sets only for a single newsletter while the maintenance module can do for multiple newsletters at once. This difference between block and maintenance page is intentional, as the block is intended only for new signups to a specific newsletter, not for changing existing subscriptions.
Manually unsubscribing a member
The easiest way is to go to where members signup, and act on their behalf.To unsubscribe a member from a newsletter:
- Log in with your administrative account, if you haven't already got an admin login open
- Go to the newsletter module (site:newsletter page-link, About > Newsletter on the default menus)
- Enter the e-mail address you wish to unsubscribe. Leave all other fields blank.
- Click "Join newsletter/Change settings"
Blocking recipients (advanced)
If you wish to create a list of e-mail addresses to never send to, you can do so by making an uploads/website_specific/newsletter_blocked.csv spreadsheet file. Put each e-mail address on its own line. A CSV spreadsheet file with a single column is the same thing as a simple text file with one entry per line, so it's really simple to edit, whichever way you wish to work. The filter works behind-the-scenes between you choosing to send out your newsletter, and Composr actually sending it. If you have the filter successfully in place then Composr will confirm this with an "You have a uploads/website_specific/newsletter_blocked.csv spreadsheet file in place, blocking (number of addresses) e-mail addresses from receiving the newsletter." message on the newsletter authoring screen ("Send out issue").The block list is useful for situations such as:
- A previous send failed part-way-through for some reason, and you have a list of users you know it did get sent to already.
- You maintain a manual list of users who have unsubscribed and you are very careful to not send to them, even if someone re-subscribes them.
- You want to block a list of e-mail addresses you know belong to competitors.
Data and Privacy Protection Laws
The interface for globally unsubscribing from all mail
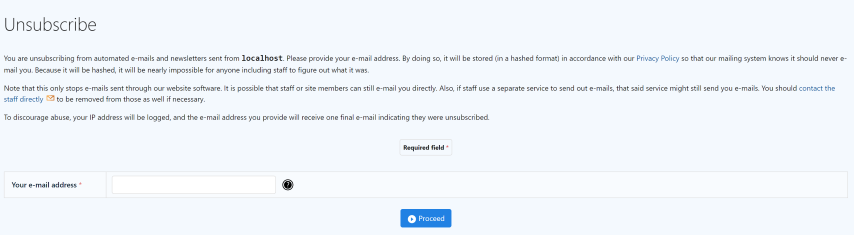
(Click to enlarge)
Fortunately, Composr offers two built-in mechanisms for this which are both automatic:
- Newsletters have their own unsubscribe link provided in the e-mail. This allows members to unsubscribe themselves from all newsletters but still allows them to receive other e-mails from the site (e.g. notifications).
- All mail sent from a Composr site by default (in the MAIL template) includes a link to data/unsubscribe.php. This simplified interface allows users to unsubscribe from all e-mails sent by your site; think of it as a global blocklist. Also by default, the "List-Unsubscribe target" configuration option will point to this endpoint so that mail clients can provide a one-click "Unsubscribe" button to recipients.
Sending newsletters
Sending a new issue
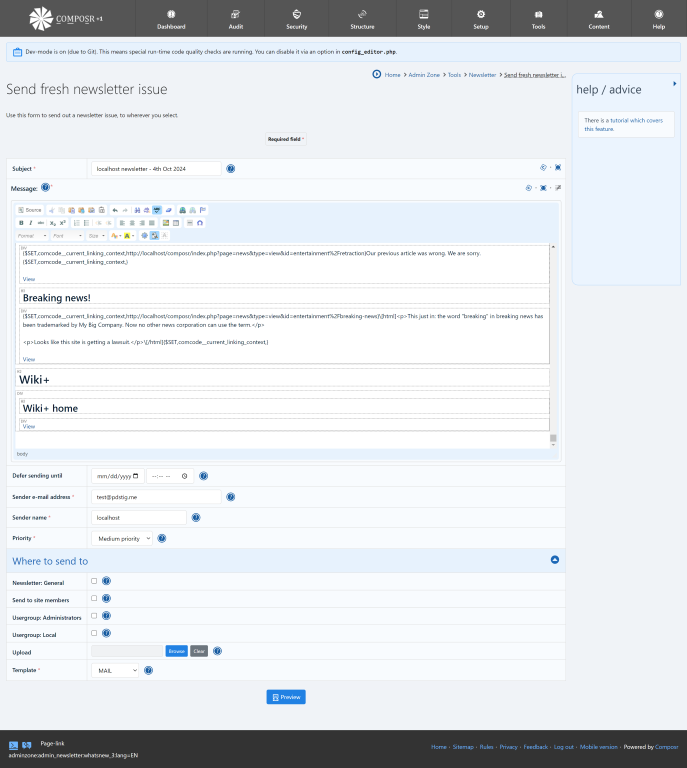
(Click to enlarge)
Admin Zone > Tools > Newsletter > Send fresh newsletter issue
In the form you will need to primarily fill the subject line and body for the newsletter. Newsletters are written in Comcode and can be edited using the WYSIWYG editor.
You need to choose where to send it to. Usergroups/newsletters with no members (to be precise, no members that can receive e-mails) will not be shown as options.
Before your newsletter is sent, you have an opportunity to preview it, so you can ensure it is correct. Look at your preview carefully, as it is easy to make minor typographical or layout mistakes that would affect the professionalism portrayed in these bulk e-mails. You will also be e-mailed the newsletter during the preview stage so that you can perform the ultimate check.
If you have the system scheduler configured, once you proceed to send the e-mails to individual members will be put in 'drip' queue, and mails will be sent out on a cycle. This works around server limits and avoids overloading the server.
Scheduling
When composing your newsletter you will be given a choice to send it out at a scheduled time (if you have the system scheduler configured). This is particularly useful for companies that need to coordinate a marketing plan.Dual format e-mails (advanced)
Be wary of WYSIWYG
You can use the WYSIWYG editor for making newsletters if you wish, but it is not advisable if "Support plain-text e-mails" is enabled, because plain-text readers will get some really ugly plain-text from it. If you make the newsletter using manual Comcode, the plain-text readers will see the Comcode, which is intrinsically easy to read.
Basic templating
In order to change the newsletter appearance, to something more pleasing, you may wish to edit the NEWSLETTER_DEFAULT_FCOMCODE.txt template. This is a template that defines the default newsletter, and hence you may fill it with Comcode to surround your actual newsletter text, such as to format your newsletter mails in an attractive manner.Additionally, the US CAN-SPAM act and the UK-equivalent (and likely many other laws in various countries) require you to include a physical address in your mailings, so you should include this in the template.
You also are likely to want to edit the MAIL.tpl template, which defines how e-mails generally look.
You will almost certainly want to edit these templates within the default theme, because if you are sending newsletters from the Admin Zone almost certainly the default theme will be the active theme when the newsletters are generated.
Information on more advanced templating is provided further down in this tutorial.
Custom mail templates for newsletters (advanced)
When you send a newsletter you can select a mail template to use. Only templates matching the filename pattern MAIL*.tpl will be shown.If you want new template options here you must manually create new templates with names like this. They must follow the same basic structure as the default MAIL.tpl.
Automatic issues
Choosing and arranging content/categories
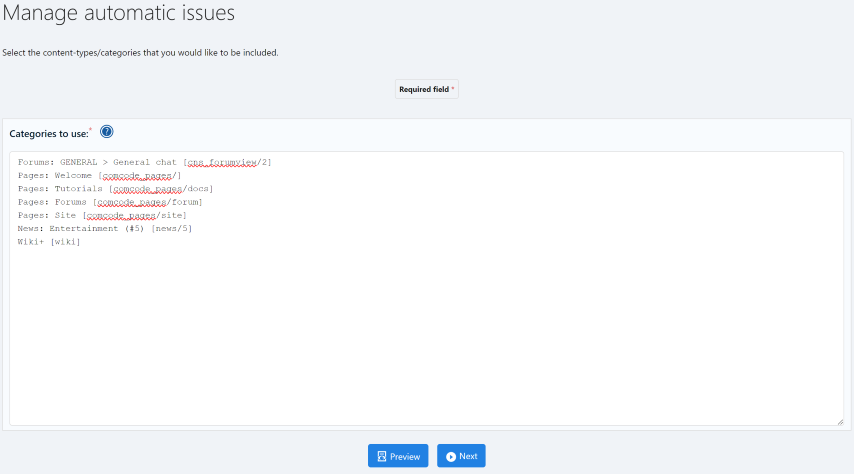
(Click to enlarge)
Basic parameters for an automatic issue
(Click to enlarge)
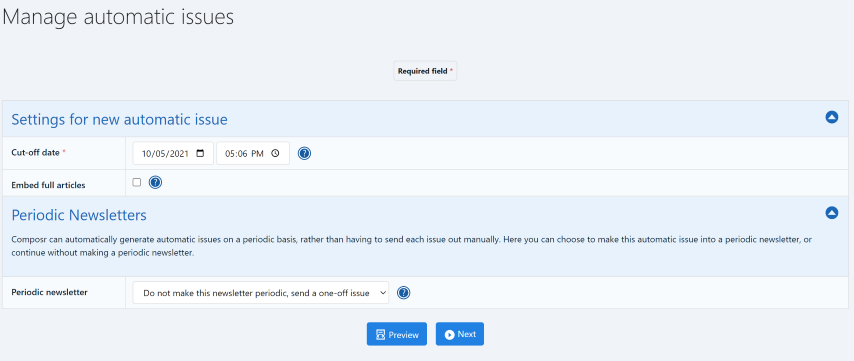
- Access this functionality from:
Admin Zone > Tools > Newsletter > Manage automatic issues
You will find you can add (and edit/delete) automatic issues from here. - This will take you to a new screen to define some basic parameters. You can choose whether this will be a periodic automatic issue or just a one-off automatic issue. Configure as appropriate. Periodic automatic issues require the system scheduler to be configured. Click "Next" when done.
- You will be taken to a form that lets you pick what content to include. This consists of a number of lines referencing content and categories, and you must re-arrange/delete lines as appropriate. For each content type supported, it shows only if there are less than 300 items that would be covered (configurable via the "What's New cut-off point" configuration option). If there are 300 or more, then it considers the content type too common to include and no items are shown. Click "Next" when done.
- If you are sending a one-off then in the next step you get the opportunity to edit the newsletter before it is sent, to add additional information or otherwise customise existing information to make your newsletter is appropriate. For periodic automatic issues you can't do this, for obvious reasons. From now on the process is like sending a normal new issue – you get to choose who to target to, see a preview, and confirm.
Making media links link to content (advanced)
If you want to make any media links within the newsletter point to the content resources rather than to the normal media locations (e.g. full-screen media views), then you can edit the NEWSLETTER_WHATSNEW_RESOURCE_FCOMCODE.txt template as follows:Code
[title="3"]{NAME@}[/title]

[surround]{+START,IF_PASSED,IMAGE_URL}[img float="right"]{$THUMBNAIL,{IMAGE_URL},170,,,,,,,1}[/img]{+END}{+START,IF_PASSED,DESCRIPTION}{+START,IF_NON_EMPTY,{DESCRIPTION}}\{$SET,comcode__current_linking_context,{URL}\}{DESCRIPTION}\{$SET,comcode__current_linking_context,\}

{+END}{+END}[url="{!VIEW#}"]{URL@}[/url][/surround]
Creating from news
In a similar vein to automatic issues, you may create newsletters from news. To do this, just visit the view page for the news that you wish to use and click the appropriate link. You will then be given the choice to refine the newsletter before it is sent.Customised targeting
You may export the newsletter subscribers to a spreadsheet file, change it somehow (using whatever strategy you like) and then choose to send out newsletters to your altered copy of the spreadsheet file.This can be used in many ways, such as:
- Splitting up the subscribers, to do split testing
- Manually removing competitors from the list
- Picking out certain members from the newsletter list based on some kind of characteristic (you might use extra software to correlate this against another database in some way)
- Migrating the subscriber list to another piece of dedicated newsletter software, or sending it to an expert newsletter design company for targeting
You can also import subscribers from a CSV spreadsheet file, or send a newsletter to a CSV spreadsheet file (this is done on the newsletter form). Composr is quite flexible in supporting different layouts of CSV spreadsheet file: it will try and auto-sense which columns are which.
All these features are available under Admin Zone > Tools > Newsletter.
Detailed templating (advanced)
Parameters
You have the following template variables available to you to reference in your newsletters:- {TITLE}, The subject line of the e-mail (and also the equivalent of {TITLE} in the MAIL.tpl template)
- {FORENAME}, The forename (first name) of the subscriber (may be blank if it is not known)
- {SURNAME}, The surname (last name) of the subscriber (may be blank if it is not known)
- {NAME}, The full name of the subscriber (either a combination of forename and surname, the members username, or the NEWSLETTER_SUBSCRIBER_DEFAULT_NAME language string – depending on what data is available on the reader)
- {MEMBER_ID}, The member ID of the subscriber, or blank if there is no discerned member ID
- {EMAIL_ADDRESS}, The e-mail address of the subscriber
- {SEND_ID}, A special code identifying the subscriber (starts with m if it is a member, or n if it is a newsletter subscriber)
- {UNSUB_URL}, A URL to unsubscribe from (one-click unsubscribe for newsletter recipients, a link to account settings for other recipients). If you are using unsub_url in a Comcode newsletter it is very important not to insert it plainly, as Composr will look at the link for a link caption and incidentally click that link for every user. Instead use a Comcode url tag and hence tell Composr what caption to give the link.
These parameters work both in the body of an individual newsletter and the NEWSLETTER_DEFAULT_FCOMCODE template.
Custom Profile Fields
If sending newsletters to members (via usergroups), rather than via newsletter signup, you can reference Custom Profile Fields using normal Tempcode. For example, to find field #20 for the recipient, {\$CPF_VALUE,20,{MEMBER_ID}}.Full HTML
Want to take things to the next level with your newsletters? You can create full HTML newsletters.Creating templated newsletters is best shown by example (this is the newsletter itself, fed into the field when you send the newsletter, or put inside the NEWSLETTER_DEFAULT_FCOMCODE.txt template that prepopulates that field):
Code (HTML)
<html>
<head>
<meta http-equiv="Content-Type" content="text/html; charset={!charset}" />
<title>{TITLE*}</title>
</head>
<body>
{$,Try and figure out the best greeting from the data available - we prefer to welcome people by forename but we might not have it}
<p>Dear {+START,IF_NON_EMPTY,{FORENAME*}}{FORENAME}{+END}{+START,IF_EMPTY,{FORENAME}}{NAME*}{+END},</p>
{$PARAGRAPH,{$?,{$IS_EMPTY,{CONTENT}},Your text goes here.,{CONTENT}}}
<hr />
{+START,IF_NON_EMPTY,{UNSUB_URL}}
<p style="font-size: 0.8em">You're receiving this newsletter because you subscribed at some point. Not interested anymore? <a href="{UNSUB_URL*}">Unsubscribe</a>.</p>
{+END}
{+START,IF_EMPTY,{UNSUB_URL}}
<p style="font-size: 0.8em">You're receiving this e-mail because you are a member on {$SITE_NAME*}.</p>
{+END}
</body>
</html>
Note how the example includes the html tag, etc – it is not a snippet, it is a full piece of HTML. This is optional, but if you do write your newsletters like this Composr will be clever enough to bypass wrapping the newsletter in the standard MAIL.tpl template. It will also assume that the body of any new newsletter is in HTML, so Comcode will no longer be supported (but Tempcode will work).
This bit may confuse you: {+START,IF_NON_EMPTY,{forename}}{forename}{+END}{+START,IF_EMPTY,{forename}}{name}{+END}
It is saying "if the forename is available, use the forename, if the forename is not available, use the username".
Processing flow
Newsletters are processed for each recipient in the following steps:- Tempcode evaluated in the newsletter body
- Parameters bound to the above Tempcode ({FORENAME} etc)
- Wrapper template applied
- Parameters bound to the wrapper template
- If in Comcode format, Comcode is evaluated by Composr's mailer – otherwise raw-HTML is sent
Bounce filtering (advanced)
There is a feature for removing newsletter subscribers that bounce e-mails (i.e. dead e-mail accounts). This stops noise coming back when you send out a newsletter, and increases the efficiency of future sends.Access this from under Admin Zone > Tools > Newsletter > Bounce filter.
The removal process also removes the "allow staff e-mails" setting from members who have a matching e-mail address.
This tool utilises the Javanile IMAP library bundled with Composr.
You should manually move anything sent to your website e-mail address that looks like a bounce e-mail into a new bounces folder, and then run the tool upon that folder:
- Go to Admin Zone > Tools > Newsletter.
- Select the "Bounce filter" icon.
- Enter your server IMAP details.
- Select your bounces folder (if Composr can see one that matches the word "bounce", it will be auto-selected). Note that if you select a folder with too many e-mail messages in (i.e. something that doesn't just contain bounce e-mails) then Composr could give you an error due to running out of memory
Composr will then show e-mail addresses found within e-mails in the selected folder, where it can find a matching newsletter/member account for an e-mail address. Any e-mail address attached to an e-mail that looks like a bounce e-mail will be auto-ticked (auto-checked). If you are confident the IMAP folder only contained bounces, you can tick (check) the remaining addresses.
If you proceed through, all ticked (checked) e-mails will be removed from the newsletter / have their "allow staff e-mail" member setting disabled.
Newsletter archive
There is a newsletter archive available (from under Admin Zone > Tools > Newsletter > Newsletter archive), so that you may browse through past newsletters, to make sure you present a consistent image, and generally keep track of what has been sent out in bulk for professional reasons.Welcome e-mails
Welcome e-mails allow you to automatically send out e-mails to new members. This is described in the Advanced Composr member system tutorial.See also
- Releasing news & running a Blog
- Understanding and configuring e-mail
- Legal and social responsibilities
- https://www.litmus.com/
Feedback
Please rate this tutorial:
Have a suggestion? Report an issue on the tracker.