Composr Tutorial: Basic configuration and getting started
During basic configuration, you will be familiarising yourself with Composr for the first time. Please be patient: there is a lot to Composr, but once you have a mental image of how things work, you will find it a very powerful and malleable system.
Immediately after installing
Reaching the Admin Zone from the main website
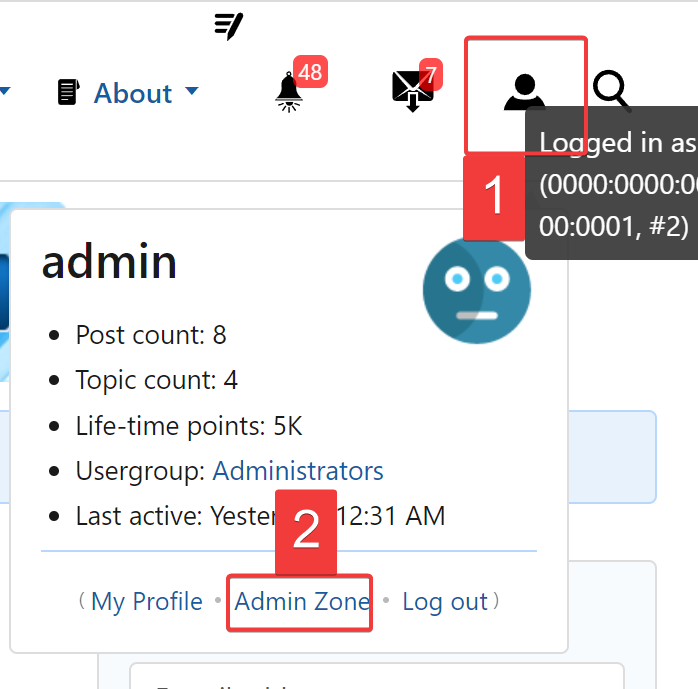
(Click to enlarge)
- view your website
- run the Admin Zone's Setup Wizard (recommended)
In either case you will be required to log in. Log in using an administration username. If you installed using Conversr (Composr's own forum system), the username and password will have been specified during installation (with the username being 'admin' by default).
If you choose to view your website, you are presented with a screen saying that the site is closed, with a login link. Once logged in, there is a link to the Admin Zone in your 'login block' (alternatively, you can always access your 'Admin Zone' directly by appending /adminzone to your website's URL).
You will see that the Admin Zone keeps reminding you to run the Setup Wizard, so do so when you are ready.
The Setup Wizard
The Setup Wizard
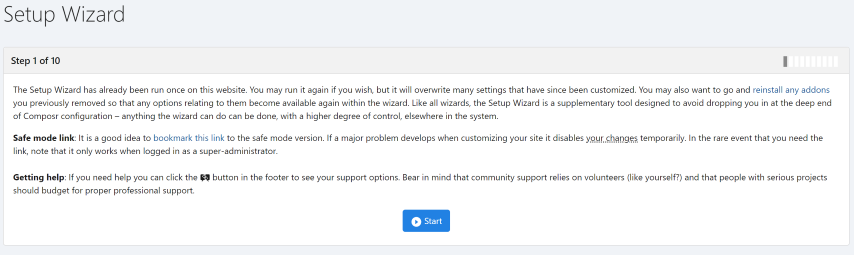
(Click to enlarge)
If you run the Setup Wizard, you may wonder later what it actually did, especially if you want to undo it.
The Setup Wizard can perform the following behind-the-scenes functions:
- Generating a "Theme Wizard" theme. You can access the Theme Wizard from Admin Zone > Style > Themes, Theme Wizard link (under Add Theme).
- Generating a "Logo Generator" logo. You can access the Logo Generator separately, from Admin Zone > Style > Logo Wizard.
- Setting site options. You can access these from Admin Zone > Setup > Configuration.
- Removing predefined content. Predefined content can be removed (e.g. default banners). Once this is removed you'd need to put it back manually, by adding it as you would any other content.
- Placing blocks. Blocks are dynamic features embedded directly into your pages/design (other software may use the term 'widgets'). You can place/change blocks via the Zone Editor at Admin Zone > Structure > Block/panel layout (Zone Editor).
- Copying rules. You can edit the rules page manually from Admin Zone > Content > Pages (Comcode pages).
Important – the Setup Wizard is usually a one-off process
 A very common mistake is to think of the Setup Wizard as a core part of Composr that you re-run whenever you want to make certain changes. This is not the case: it is a tool to help you get started, and not the main method for configuring Composr. Anything in the Setup Wizard is configurable elsewhere within Composr. Anything you see pre-set in there does not necessarily represent the current configuration of your site, just the default outcome of running the wizard.
For these reasons, we actually give out a warning if you re-run the Setup Wizard.
Security level
On step 3 of the Setup Wizard, one of the options available is Security level. Depending on the selection, a number of security configuration options will be set. You can always change these under Admin Zone > Setup > Configuration at any time.Generally, we recommend the following security level depending on your use case:
- Minimum should only ever be used for very basic websites which will not utilise social features or public registrations (e.g. informational only sites).
- Low should only be used for websites using very basic social features and will not be handling much personal information. And any personal information handled will not involve children nor will be personally identifiable.
- Medium is recommended for most websites who do not utilise eCommerce functionality or handle highly-sensitive personal information.
- High is recommended for websites using eCommerce or will handle very sensitive personal information (e.g. sensitive custom profile fields or sites geared towards children).
- Ultra high is recommended for websites handling extremely sensitive data or functions (e.g. banks, government departments, cyber-security sites).
| Config option | Minimum | Low | Medium | High | Ultra High |
|---|---|---|---|---|---|
| Content Security Policy | Off | Off | On | On | On |
| Session expiry time | 1 day | 3 hours | 1 hour | 30 minutes | 15 minutes |
| Password reset process | Reset link e-mailed | Temporary password e-mailed | Temporary password e-mailed | Vague reset e-mail sent | Vague reset e-mail sent |
| Password expiry days | Never | Never | Never | 1 year (365 days) | 1 quarter (90 days) |
| Minimum password length | None | 4 characters | 8 characters | 12 characters | 16 characters |
| Minimum password strength | None | 2/10 | 5/10 | 8/10 | 10/10 |
| Login error secrecy | Off | Off | Off | On | On |
| IP-strictness for sessions | Off | Off | On | On | On |
| Cryptographic ratchet | 0.025 seconds computation | 0.05 seconds computation | 0.1 seconds computation | 0.25 seconds computation | 1 second computation |
| One guess per CAPTCHA | No | No | Yes | Yes | Yes |
| CAPTCHA Noise | Off | Off | On | On | On |
| Audio CAPTCHA | On | On | On | On | Off |
| Brute force threshold | 30 failed logins | 15 failed logins | 10 failed logins | 5 failed logins | 3 failed logins |
| URL Monikers | On | On | On | On | Off |
| .htaccess restrictions on maintenance scripts | No | No | No | Yes | Yes |
| Enquire on new IP addresses | No | No | Administrators | Administrators and Moderators | Administrators and Moderators |
Notifications
Chances are that you'll want e-mailing whenever things happen on your site. You can do this through your personal notification settings. Go to your profile, choose the Edit tab, and choose the Notifications sub-tab.In particular you'll probably want to know about content needing validation, various kinds of messaging activity (e.g. support ticket posting), and eCommerce activity.
This is described in more detail in the Notifications tutorial.
Editing configuration
The list of configuration sections

(Click to enlarge)
The most important area of the configuration are the General options in Site options
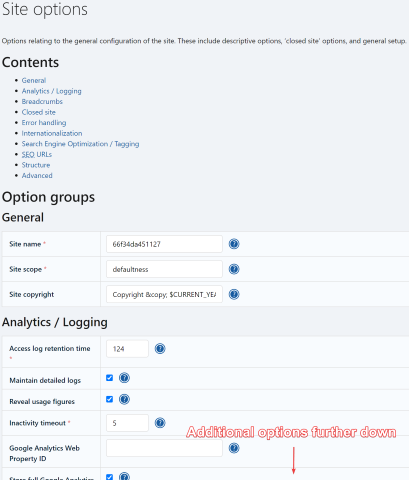
(Click to enlarge)
After upgrading, options that need your attention are highlighted
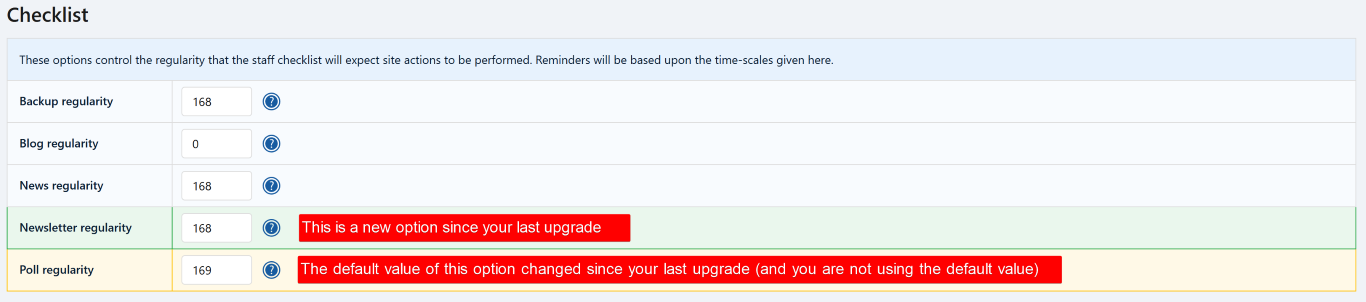
(Click to enlarge)
You'll want to configure your configuration, at Admin Zone > Setup > Configuration.
When you visit the full configuration page to fine tune your configuration, you will see that configuration options are split into a number of sections and subsections.
The most important options are in 'Site options', choose that and scroll down your browser window until you find the subsection entitled, 'General'. Once done, scroll to the bottom of the page and click the 'Save' button.
There are many more options in the main configuration, and the actual options available depend on which addons are installed.
Repeat for all other sections you may want to edit.
We don't list all the options in the documentation because they are often either obvious/self-describing, or too specialist to mention – so it's a good idea to browse through to see what interests you.
Also, be aware that when you upgrade Composr or install new addons, configuration options may be highlighted in green or yellow. This is to draw your attention:
- Green options are new, and you have never set them before.
- Yellow options had a change in their default values, and you are not using the default. You may want to click '?' to review the new default and decide if you want to use it.
Editing default Comcode pages
There are a number of default pages on your site. Standalone editable pages within Composr are called "Comcode pages".For details on how Comcode pages work and what the default ones are, see the Adding standalone pages of content (via Comcode) tutorial.
Default banners
If you are not running a community site, you will almost certainly want to delete the default banners. Three banners are added into the system by default, to give websites a 'leg up' and a working view of the banner rotation: but they may not be appropriate. If you ran the Setup Wizard then you have already been given a choice to remove these banners automatically.Editing logo theme images
Editing a logo theme image
(Click to enlarge)
Choosing theme images to edit
(Click to enlarge)
When you change images, styling, or low-level HTML structure (defined in templates), you are editing the theme of the site. Therefore to do it, you should go to Admin Zone > Style > Themes.
When you choose to manage images in the default theme, you will be warned against editing the default theme; for this simple task, the warning is irrelevant, and we therefore recommend you click 'ok'. If you are feeling adventurous, you could add a new theme, and continue sculpting your theme as you go.
Choose logo/-logo (the logo for the Welcome Zone, and the logo for any zone that does not have its own) from the drop-down list presented. After clicking the button you will see the current image; all you need to do is create your own replacement on your computer (as a .jpeg/.jpg, .gif or .png file) and choose to browse for it to upload. You do not need to erase the current URL, as your upload will replace it, and you definitely should leave the 'Name' field unchanged.
Your choice of image file formats:
- Use either .png, .jpg, or .gif files:
- .jpg is usually the best choice for a logo, because the file size can be very low. Be aware though that the JPEG format is a 'lossy' format, i.e. the higher the compression, the lower the quality of the image. JPEG does not support transparency.
- .png never loses quality, and also supports transparency – but the sizes are a bit larger.
- .gif is only really a good idea if you need animation, which is unlikely for a logo. Soon will be able to do animation with .png via APNG.
- Do not ever try and use .bmp files with Composr, as they do not have proper compression, and are designed for Windows only.
Editing menus
The menu editor

(Click to enlarge)
The default menu

(Click to enlarge)
The menu editor is covered in the Customising what's on the menus tutorial.
The system scheduler
In order for aspects of Composr that support scheduling to work it is necessary to set up a system level scheduling task to run the data/cron_bridge.php file at least every 10 minutes (but ideally every minute). By doing this, you tie in Composr's system scheduler with the server's scheduler.Examples of scheduling scripts:
- Sending out calendar event notifications
- Sending out regular notification digest e-mails
- Sending out birthday notifications
- Running automated backups
- Sending automated welcome e-mails to new members
- Sending catalogue view reports and handling classified ad expirations
- Sending out reminders for registration confirmation mails that were not ever actioned by the joining member
- Sending out automatic newsletters
- Sending newsletters (dripping out e-mails over a period of time, to stop resource spiking)
- Processing tasks that are in the queue (if the task queue is enabled)
- Running purges, such as logs, personal data (privacy), and cache
- Running the Health Check
- Processing statistics
- Updating the sitemap
The data/cron_bridge.php file can either be run by passing the PHP file through the PHP interpreter (common), or by calling the URL (see "Help – my webhost does not support Cron!"). More details are in the following sections. Don't call up the URL by hand then never finish configuring it, because if you do then Composr will start assuming the system scheduler is working from then on which can make testing it a bit harder (once it is called once it is marked 'working' by the system – applicable features will become available, and the todo item will be removed from the checklist on the front page of the Admin Zone).
Specific advice for Linux
Setting up Cron in the cPanel webhosting control panel (different control panels vary in their UI)
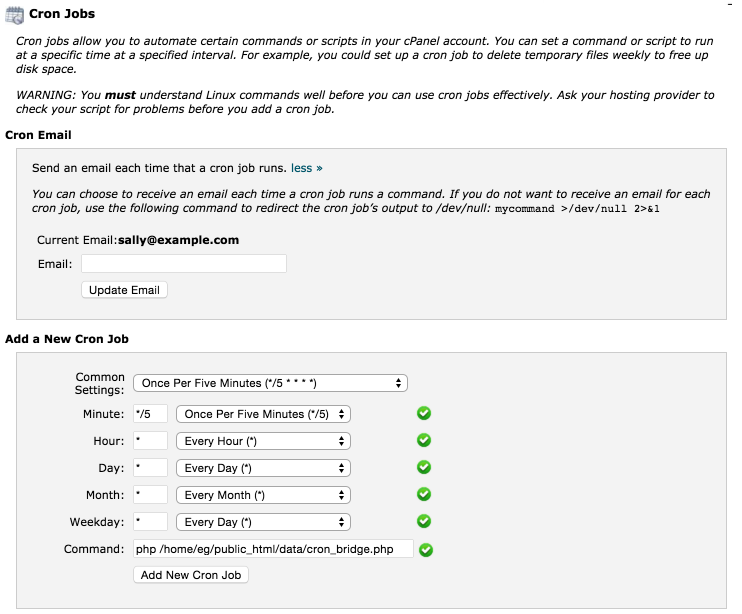
(Click to enlarge)
The following command might work for a Composr installation in the /home/examplesite/htdocs directory:
Code (Bash)
A good test is to try running the command you end up choosing manually in a command prompt, to check it is correct.
You should schedule Composr's cron_bridge.php script to be loaded at least every 10 minutes. The manual Cron configuration (if you do it this way) will look like this:
Code (Bash)
Sandboxed Cron
Some webhosts only allow you to execute Cron commands directly under your home directory. This means you cannot call up the PHP command directory like above.A workaround is to make a data/cron_bridge.sh file (with execute permissions) containing:
Code (Bash)
php cron_bridge.php
Specific advice for Windows
On Windows the following command might work for a Composr installation in the c:\sites\examplesite\www directory where PHP is in c:\php:Code
c:\php\php.exe c:\sites\examplesite\www\data\cron_bridge.php
The following is a step by step process for scheduling the running of cron_bridge.php every 5 minutes:
- Open up 'Task scheduler' (in your taskbar's 'Search' section, search for 'Task Scheduler')
- Click 'Create Basic Task' off to the right of the window
- Give the task a name and a description, then click 'Next'
- Click 'Daily' for recurrence, then click 'Next'
- Set the time and to re-occur every 1 Day, leave the start day and time to now, then click 'Next'
- For the action, Click 'Start a Program', then click 'Next'
- Under program/script add the location of php.exe on your system: something like "C:\php\php.exe" – also include the double Quote Marks ("") surrounding the file location because this is a command, and non-quoted spaces will result in an error
- Under 'Add arguments' add the location to the cron_bridge.php file which for the example above would be "c:\sites\examplesite\www\data\cron_bridge.php" (note how the PHP command is split across two parameters – step 7 having the php.exe path and step 8 having the PHP file path) – again surround in quote marks.
- Click 'Next'
- Tick (check) "Open the properties dialog for this task when I finish", then click 'Finish'
- Under 'General', Change "Run only when user is logged on" to "Run whether user is logged on or not"
- Tick (check) "Hidden"
- Click 'Change User or Group'
- Set to IIS_IUSRS (or whatever the user your webserver is configured to use, if you customised that)
- Click 'OK'
- Click the 'Triggers' tab
- Double click the 'Daily' trigger from the list
- Tick (check) 'repeat task every' box and change the "1 Hour" to "5 Minutes"
- Change 'for a duration of' to 'Indefinitely'
- If you want to terminate hung PHP processes, tick (check) 'Stop task if it runs for longer than', and set to 1 hour
- Click 'OK'
- Click 'OK'
This step by step was created using Windows 11, the process may change slightly in other versions of Windows.
Help – my webhost does not support Cron!
In the event your hosting platform does not allow you access to Cron, there are a number of options available to you. One easy option is to have scheduled tasks run in the background when visitors access your site. To do this, you need to go to the Admin Zone > Setup > Configuration > Performance options, and tick (check) "Web requests run scheduled tasks".There are a couple caveats to using web requests:
- This will only work if your server supports PHP's register shutdown function. Most servers do.
- This is not a reliable way to ensure scheduled tasks run on time. It depends on someone making a page request to your website to trigger making the tasks run in the background.
Alternatively, you can use an external service to call the data/cron_bridge.php script by URL:
- EasyCron provide direct instructions for Composr, and free and paid plans: https://www.easycron.c…t-up-cron-job-for-composr
- Other free options are https://www.setcronjob.com/ (up to every 5 minutes but the schedule needs to be re-set every week) and https://www.onlinecronjobs.com/ (up to 5 jobs twice a day).
Simply sign up and add the URL i.e. http://yourbaseurl/data/cron_bridge.php to the scheduler and set how often you want it to run.
Parameters
There are a number of parameters you can pass to cron_bridge.php, either as URL parameters, or command line parameters.- limit_hooks – Pass the name of PHP files in sources[_custom]/hooks/systems/cron to limit to just those scheduler items; useful if you want to force certain items to run more regularly; if you pass just a single item name then normal wait times for processing that item will be ignored
- include_msn – When Composr has multi-site-network sub-sites, whether to run the system scheduler on all those sub-sites
- Debugging:
- verbose – Whether to put out extra output (not recommended when tied into Cron, as it will likely e-mail you every time it runs – for that enable Cron logging instead from Admin Zone > Audit > Error Log)
- query_mode – Whether to just spit out a Cron configuration command instead of running the scheduler
- force – Whether to ignore scheduler item locking (for developers only); can be useful for testing and also clearing out stale locks
- Loop configuration:
- loop – Whether to not exit and just keep looping, for maximum processing speed (shared webhosts may not like this)
- loop_wait_seconds – The number of seconds to wait between each loop cycles, to avoid constantly querying the database (default 3 seconds)
- loop_max_seconds – The number of seconds before finishing the loop, in case memory usage keeps creeping up (default 3595 seconds, which is 5 seconds less than an hour, intended to align with the next Cron call)
For example, to call the system scheduler but only to execute tasks, with verbose info…
Via URL:
http://yourbaseurl/data_custom/cron_bridge.php?limit_hooks=tasks&verbose=1
Via command line:
php cron_bridge.php –limit_hook=tasks –verbose
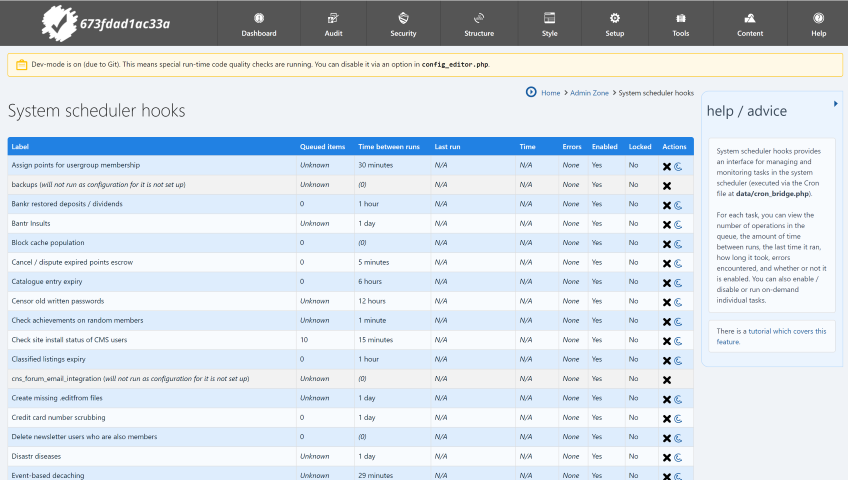
System scheduler interface
The system scheduler hooks interface
(Click to enlarge)
- Number of operations / items queued
- Time between each run
- Last run
- Amount of time the script took to execute
- Errors encountered
- Whether it is enabled
- Whether it is locked (this either means it is running now or it suffered a critical error; in the latter case the hook will not run again for 24 hours unless manually run)
- Action buttons to enable/disable scripts or to execute scripts on-demand individually
This page also allows you to enable or disable specific scheduler hooks and to force-run a hook on-the-fly with verbose output.
Errors and Locking
The system scheduler supports basic locking. Each hook is 'locked' when execution begins, and then 'unlocked' when execution is finished and no errors were encountered.If a hook encounters an error, it will stay locked, which means it will not run again for 24 hours. The hook will remain locked so long as it continues resulting in an error. Once it runs without any errors, it will be unlocked. You can force-run a locked hook to clear its lock (e.g. after updating Composr).
Additionally, when a hook encounters an error, it will be logged to your main error log. And if you have telemetry enabled, it will be relayed to the core developers automatically for review. Because the hook locks itself on error and will not run again for 24 hours, this should prevent your main error log from quickly filling up from a broken hook.
Background tasks locking
The background tasks hook behaves differently. If a background task fails, it will be individually locked rather than locking the entire tasks hook. The locked task must be manually run (without error) to clear its lock. Or, you can delete it from the database if you do not want to run it.Closed site, and opening
Your site is initially closed
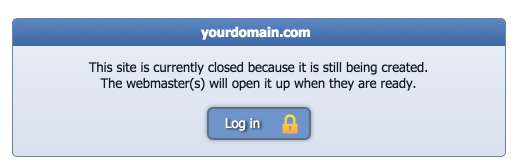
(Click to enlarge)
Admin Zone > Setup > Configuration > Site options > Closed site.
It's not advertised in the interface, but it is possible for a user to join a closed Conversr-powered site if they have been given the URL to the join module (they can't see any panels in this event). Once they have joined they can't log in though unless they have subsequently been put in a usergroup with 'Access closed site' permission. The reasoning here is that the staff may give out the join URL and ask someone to use it, and then give special access because they want them to be able to get in early. If you do not like this behaviour, you can alter the join-module's permissions so that the Guest usergroup cannot access it.
Concepts
- .htaccess
- A file used by the Apache web server to set configuration options that apply to the directory (and sub-directories thereof-) that the file is contained in
- Main Admin Zone Configuration
- The 'Configuration' module of the Admin Zone
- Installation Options
- The Installation Options for low-level settings such as database settings, available from config_editor.php
- System scheduler
- Composr's scheduler system, tying Cron to Composr's scheduler scripts so that they may be launched
- Setup Wizard
- A quick-start wizard for setting up common settings and profiles on a new Composr site
See also
- Installation
- Security
- Themeing your site
- Advice for choosing and managing staff
- Legal and social responsibilities
- Comcode and the attachment system
- Adding standalone pages of content (via Comcode)
- Customising what's on the menus
- Advanced configuration
- Notifications
Feedback
Have a suggestion? Report an issue on the tracker.