Composr Tutorial: eCommerce
- Usergroup subscription (i.e. sell site access)
- Member invoicing
- Shopping catalog / shopping cart
- One-off purchases (various inbuilt products available, and configurable extension products)
- Programmers may also add new product types, including things with digital delivery
eCommerce support is tied to a payment gateway, such as PayPal – and/or to points.
The system is highly extensible, where new dynamically handled and integrated products or services can be added by minimal coding by a programmer.
The eCommerce system may also be used with community points.
Payment gateways
Important – research your gateway
 It is the webmaster's responsibility to research any payment system before use, to convince themselves they are happy with the quality and terms of service.
While Composr by default only supports particular payment gateways, this should not be considered an endorsement of any of those services.
The banking system runs with international standards for things such as:
- credit cards
- debit cards
- cheques ('checks' in American English)
Cheque processing is relatively straight forward, but more infrastructure is needed to process credit or debit cards. This is accomplished by using a payment gateway in one of two ways:
- By getting an agent to fully handle the transaction and relay the funds
- By having a merchant account with a bank, using the banks infrastructure and your bank account to manage the transaction yourself
Composr, by default, allows payment via PayPal (maintenance status) & CCBill (maintenance status) & Authorize.Net (maintenance status), although it could be extended to support any kind of payment gateway if extended and customised by an appropriate professional. PayPal is fully supported; others are not regularly tested and intended for developers (usage instructions are included as comments within Composr's source code for the particular payment gateway).
PayPal was chosen because it is without doubt the leading form of payment on the Internet, easy to setup, and flexible in that it can provide support for funding direct from bank accounts, or cheque, as well as debit and credit card processing. Lots of people do not like PayPal policies, but we have no official position on this – development priorities simply follow funding.
Specific gateway notes
PayPal
To accept website payments via credit card, or to take subscriptions, you will need a Business Account. The business accounts are free, but the fees are higher.You will need to have SSL set up for your site, as PayPal requires Instant Payment Notification (IPN) messages to go via SSL, and we have already imposed this in our default code.
You must not lock down PayPal to only accept encrypted forms. Composr does not encrypt forms.
If you want to set up Payment Data Transfer (PDT), follow these instructions:
- Go to your PayPal's Website Payments settings, and Website Payment Preferences page.
- turn on “Auto Return”.
- For the return URL, specify your http://yourbaseurl/index.php?page=purchase.
- Turn on “Payment data transfer”.
- Copy the data transfer identifier that appears on your screen.
- On your Composr website, go to Admin Zone > Setup > Configuration > eCommerce options > Payment gateway (PayPal-specific).
- Paste the data transfer identifier in the relevant box, and save.
Authorize.net
The Composr software makes use of Authorize.net's Server Integrated Method (SIM) when not using local transactions, and the Advanced Integration Method (AIM) and Advanced Recurring Billing (ARB) when using local transactions.While PayPal has the Payment Data Transfer (PDT), Authorize.net has something similar called Relay Response. After a customer submits payment information on Authorize.net, while the customer is waiting for Authorize.net to respond with the status, Authorize.net will post transaction details and status back to the Composr website. If the attempt fails or errors, Authorize.net will show an error to the customer and e-mail the merchant. This contrasts from PayPal which simply re-directs the customer back to the Composr store; Authorize.net acts as an intermediary which allows them to e-mail the merchant should an issue occur between it and the Composr store.
For Authorize.net to work properly, you must add a couple of URLs to the list of accepted Response / Receipt URLs. Log in to your Authorize.net account, go to Account, Settings, Response / Receipt URLs, click Add URL, and put in the box http://yourbaseurl/data/ecommerce.php (this is for IPN). You must also add the appropriate URL for Relay Response, which will depend on your URL scheme setting in the Composr software:
- Raw PHP URL scheme: http://yourbaseurl/index.php?page=purchase&type=finish
- pg URL scheme: http://yourbaseurl/pg/purchase/finish
- htm URL scheme: http://yourbaseurl/purchase/finish.htm
- Unadorned URL scheme: http://yourbaseurl/purchase/finish
CCBill
CCBill has an application process for creating an account. During the application, you must set up Dynamic Pricing Flexforms with support. The Composr software makes use of CCBill's Flexforms to gather customer information. You can create a Flexform for single transactions and a separate Flexform for recurring transactions (subscriptions). Or you can use the same Flexform for both.CCBill uses URL redirects (PDT) and Webhooks (IPN) to send transaction information back to the store. Additional configuration is required in CCBill for this to work.
CCBill URL redirects are unreliable as they do not provide the Composr software with all the necessary information (e.g. transaction ID and accounting price). Therefore by default, the Composr software will only process transaction responses from Webhooks (IPN) when using CCBill and will ignore responses from URL redirects (the store will only show a success message to the member). To change this behavior (especially if your site is not publicly accessible from the web), you must use Commandr to change the enable_ccbill_pdt value to 1 (and change back to 0 to disable it). Note that when PDT is enabled, Webhook (IPN) responses from CCBill will be ignored.
To set up a Webhook (IPN), in CCBill, go to Account Admin > Webhooks. Use the URL ENCODED Webhook Format. Enable the following events at the specified versions:
- NewSaleFailure (version 3)
- NewSaleSuccess (version 6)
To set up URL redirects, in CCBill, go to Account Admin > Basic. Set both the Approval URL and Denial URL to the following depending on your site's URL scheme:
- Raw PHP URL scheme: http://yourbaseurl/index.php?page=purchase&type=finish
- pg URL scheme: http://yourbaseurl/pg/purchase/finish
- htm URL scheme: http://yourbaseurl/purchase/finish.htm
- Unadorned URL scheme: http://yourbaseurl/purchase/finish
Configuration
To configure the payment gateway settings go to Admin Zone > Setup > Configuration > eCommerce options.Documentation for other Payment gateways not specified below is provided in notes at the top of the sources/hooks/systems/payment_gateway/<gateway>.php file. Payment systems tend to be a bit complex and ones other than PayPal are best set up by programmers who know the particular ways messages and security works between your site and the gateway.
Config options - PayPal
The option requirements for PayPal are as follows:| Address | This section should be filled in if you are collecting sales tax. If you do not have a business headquarters, use the location from which you are selling items. |
|---|---|
| General > Use local payment | This must be disabled; PayPal does not support it |
| Payment gateway > Payment gateway | paypal |
| Payment gateway > Gateway username | This is your primary PayPal e-mail address which you will be accepting payments |
| Payment gateway > Gateway password | This should be blank |
| Payment gateway > Gateway VPN username | Any number of additional comma-delimited e-mail addresses which are allowed to be used in an IPN/PDT return from PayPal |
| Payment gateway > Gateway VPN password | This should be blank |
| Payment gateway > Digest code | If using Payment Data Transfer (PDT), this should be your Data Transfer ID |
| Payment gateway > Special identifier | This should be blank |
Config options - Authorize.net
The option requirements for Authorize.net are below.| Address | This section should be filled in if you are collecting sales tax. If you do not have a business headquarters, use the location from which you are selling items. |
|---|---|
| General > Use local payment | Authorize.net supports local payments, so if you want to collect payment information from your site opposed to Authorize.net collecting it, tick (check) this box. |
| Payment gateway > Payment gateway | authorize |
| Payment gateway > Gateway username | Your API login ID from Authorize.net (Account => API Credentials & Keys) |
| Payment gateway > Gateway password | Your API Transaction Key from Authorize.net (Account => API Credentials & Keys => New Transaction Key) |
| Payment gateway > Gateway VPN username | Your Verified Merchant Seal / Customer ID from Authorize.net (not applicable for a sandbox account) |
| Payment gateway > Gateway VPN password | This should be blank |
| Payment gateway > Digest code | Your API Signature Key from Authorize.net (Account => API Credentials & Keys => New Signature Key). Blank for no check to be performed. |
| Payment gateway > Special identifier | This should be blank |
Config options - CCBill
The option requirements for CCBill are below.| Address | This section should be filled in if you are collecting sales tax. If you do not have a business headquarters, use the location from which you are selling items. |
|---|---|
| General > Use local payment | This must be disabled; CCBill does not support local transactions. |
| Payment gateway > Payment gateway | ccbill |
| Payment gateway > Gateway username | Your 6-digit account number |
| Payment gateway > Gateway password | Your API Transaction Key from Authorize.net (Account => API Credentials & Keys => New Transaction Key) |
| Payment gateway > Gateway VPN username | Your two 4-digit sub-account numbers separated by a comma: non-recurring transactions,recurring transactions (e.g. [tt]0002,0001[/tt]) |
| Payment gateway > Gateway VPN password | This should be blank |
| Payment gateway > Digest code | This is your Salt Key |
| Payment gateway > Special identifier | This is the Flexform ID; you can provide two Flexform IDs separated by a comma, the first for single transactions and the second for recurring transactions |
Test mode
All supported payment gateways provide a test mode, which is turned on from the Admin Zone Configuration. Test mode allows you to make purchases from your website using the full eCommerce architecture of Composr and the payment gateway, except no money will actually be charged (it's a simulation mode) – the ideal way to test your setup without risking real money.You can also provide testing mode configuration options in the Payment gateway section of the eCommerce options and keep them separated from your live credentials. In any of the fields under the Payment gateway section, use the format live=LIVE_VALUE,testing=TESTING_MODE_VALUE to separate your credentials. The live value will be used unless Testing mode is enabled, in which case the testing value will be used. If you do not use this format, or you only provide one of these values, then it will be used both in live and testing mode.
Examples:
- live=foo,testing=bar will use “foo” for a live store and “bar” for a test store.
- live=pity rod,foo bar,testing= will use “pity rod,foo bar” for a live store and an empty string (blank) for a test store.
- testing=foo will use “foo” for both a live and a test store.
- foobar will use “foobar” for both a live and a test store.
- (nuance) live=1,live=2,testing=3 will use “2” for both a live and a test store; the software only looks at the first two matches, and if the key (live or testing) is the same, the second value takes priority.
- (nuance) Live=4,test=HELLO will use “Live=4,test=HELLO” for both a live and a test store; keys and values are case sensitive, and if live or testing is misspelled or not in all lower case, it will not be detected.
- (nuance) foobarlive=hello,testing=world will use “hello” for a live store and “world” for a test store; foobar is ignored.
To prevent purchases being made by real people that you don't receive real money for, only members in a usergroup with the 'Access eCommerce system when in test mode' permission may purchase when test mode is enabled (A message will be seen by others: "Purchasing is temporarily offline for maintenance. It should be back online within 24 hours: please try again later."). You have two supported testing choices:
- Enable this permission for all usergroups and test the eCommerce when the website is closed (using the SU feature, see the Testing access and privileges tutorial, Access control and privileges section)
- Test the eCommerce from your own admin account
For PayPal test mode goes through the PayPal sandbox. Sign up on the sandbox (this is your test account for making the sale), log in, and create a test user (this is your test account for purchasing).
Be advised that we have found the PayPal sandbox to be buggy. If your tests fail with errors like "The link you have used to enter the PayPal system is invalid. Please review the link and try again." then you may be experiencing bugs in the PayPal sandbox. By all means, please complain to PayPal about it – we have run tests and found the sandbox fails midway through purchases on configurations that work correctly for live payments.
For Authorize.net, testing mode goes through the Authorize.net sandbox. Sign up on the Authorize.net sandbox sign-up page.
Monetary system
Currencies
The currency the website works in is defined in the configuration (Admin Zone > Setup > Configuration > eCommerce options > Currency). You need to make sure your account with the configured payment gateway can accept this currency and is not set up to allow people to choose which currency to pay in (as it stops Composr being able to verify the payment if they use this feature). If using a third-party sales tax service such as TaxJar or TaxCloud, you also need to make sure the chosen service can accept this currency.Composr can process transactions in any one currency, but it cannot process transactions across multiple currencies. There are 2 main reasons for this:
- So custom eCommerce products can be written to transact in any currency required
- So active invoices, active subscriptions, pending payments, logged payments, and cash flow reports (transaction fees and tax) all continue to be accurate if the main configured currency is changed
Composr can automatically do currency conversions for visitors using an API key for “The Free Currency Converter API” (this can be configured in the Admin Zone > Setup > Configuration > eCommerce options > Currency).
Points verses money
Many of the products allow configurability over whether they are sold for money or for points, or some combination (a discount via using points). Products that support both money and points typically also allow a 50:50 purchase option too. Users don't choose which option, the system will calculate it for them – but they are told the discount they will get.When selling products fully with points, it is assumed that tax and shipping will not be charged. As such, tax and shipping will not be included. If selling products at a discount via points, shipping will still apply via money, and tax will be adjusted according to the discounted price.
Gambling is only available via points.
Usergroup subscriptions are only available via money (as there's already a points-based rank ladder system).
Catalogue products are only available via money, although you can set up custom products that represent shippable items that can be purchased with points.
Products overview
The eCommerce layering in Composr for usergroup subscriptions
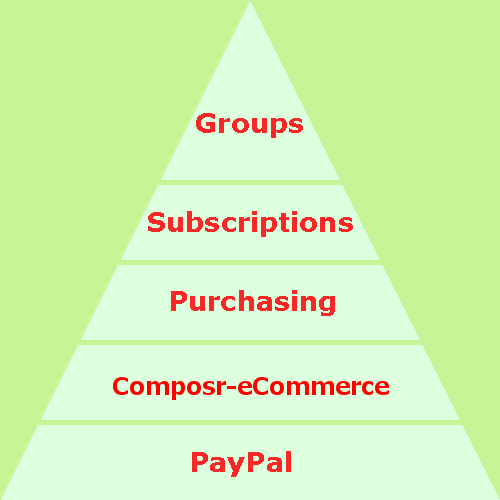
(Click to enlarge)
In Composr by default there are the following 'kinds' of 'product':
- usergroup subscription: you may configure as many usergroup subscriptions as you wish, and these are all handled by the 'Usergroup' product kind. Each configured subscription is considered a 'product' for sale on your site.
- catalogue items: these are items for sale from the shopping catalogue
- orders: these products are a collection of other products bound into a group, and generated when someone finalises an order from the shopping cart
- e-mail addresses: these are e-mail addresses on your domain that you'd set up manually after they are purchased (may be purchased as pop3 or forwarders). Quota upgrades for pop3 accounts may be purchased.
- topic pinning: pinning of requested topics on the forum
- name highlighting: highlighting of a member's name on the forum
- banners: banner advertisements, and upgrades.
- custom products: custom products that you give a label and description and set up manually
- permission products: permissions that you give a label and description and are automatically assigned. This can be used for selling access to download categories, for example.
- gambling: users may get points worth more than they pay, although on average they'll lose money/points
- work: this is a generic kind of product used to represent something that has been invoiced
- Various kinds of non-purchasable product that exist for accounting purpose – interest, tax, wage and other. These aren't for sale on your site but positive or negative transaction sums can be entered against them in the Admin Zone, so your profit/loss and cash-flow charts can be accurate.
When a member buys something, the staff are informed of it via e-mail of appropriate details.
Configuring products
(Click to enlarge)
Configuring prices
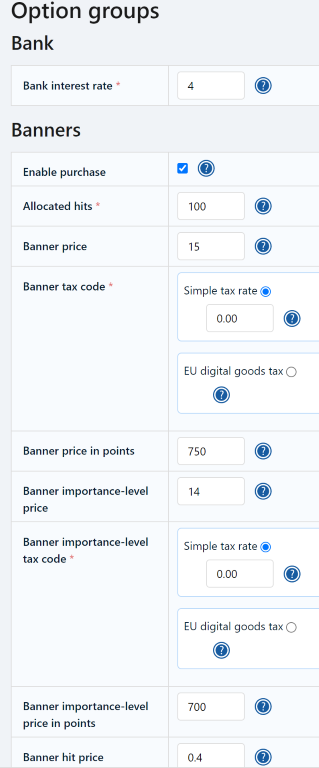
(Click to enlarge)
The purchasing module
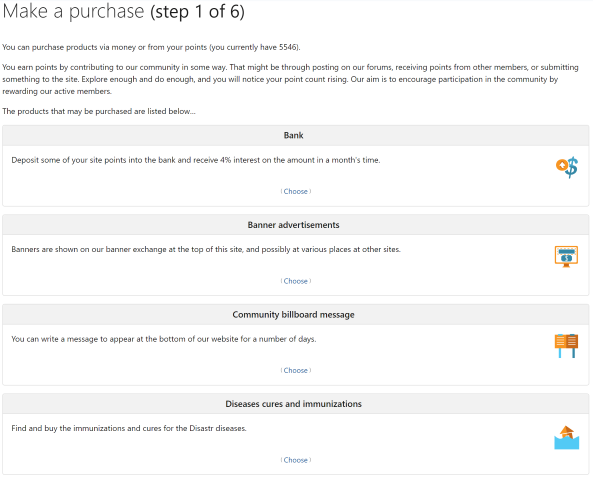
(Click to enlarge)
- One-off purchase: purchases made from the purchase module (site:purchase page-link, Content > Purchasing on the default menus) (above: e-mail addresses, topic pinning, name highlighting, banners, custom products, permission products, gambling)
- Subscription: one-off purchases made from the purchase module (site:purchase page-link, Content > Purchasing on the default menus) and managed from the subscriptions module (site:subscriptions page-link, linked from member accounts) (above: usergroup subscriptions)
- Shopping cart: an item purchased from the catalogue/shopping modules (site:catalogues/site:shopping page-links, Content > Products and Content > Shopping Cart, on the default menus) (above: catalogue items)
- Invoice: requests for payment created from the Admin Zone, paid for from the invoices module (site:invoices page-link, linked from member accounts) (above: work)
- Other (above: interest, tax, wage, other)
While the abstraction of this may be confusing, it is very beneficial as all kinds of automatically handled products may be programmed to integrate with Composr functionality.
For example, a programmer could create the following with relative ease:
- a product that increases the number of available hits on banners
- a product that sends out an e-mail to a dispatch warehouse instructing them to mail out a copy of a bands latest album to the address specified in the member profile of the buyer.
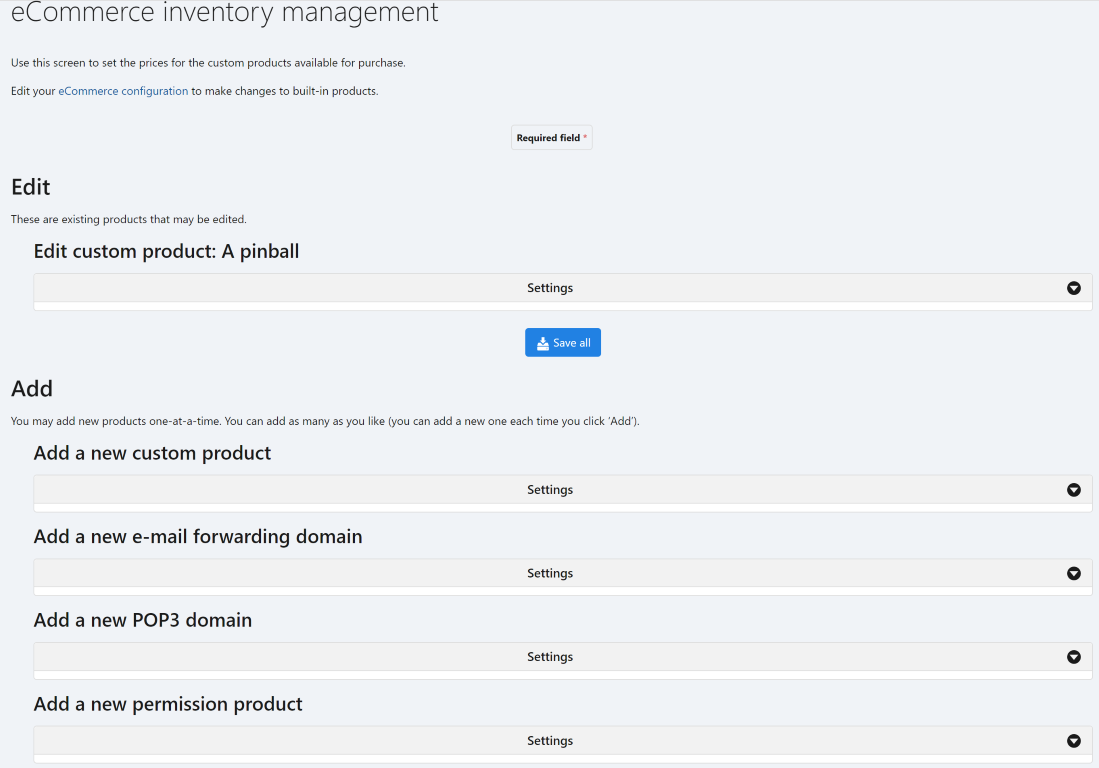
Purchasing module products
Inventory management is at:Admin Zone > Setup > eCommerce inventory management
Use this to set up those products which users can have multiple of (e-mail accounts, custom products, permission products).
Other prices are set in normal configuration options.
If you are running Conversr then there will be a member tab showing past purchases.
Banners
While by default any member may submit a banner, the implication is that an eCommerce-purchased banner would not have to serve the staff's interests so much as a banner they decided to validate for free.All banners purchased are added to the 'General' banner type.
Topic pinning
On Conversr sites, members can purchase to have a particular topic pinned on the forum.Gambling
Members can gamble points. On average, members lose out on points when they try and gamble them though.Name highlighting
On Conversr sites, highlighted usernames can be purchased. This means the buyer's name gets special highlighting within forum topics.Permission products
Configuring permission products via the inventory management screen
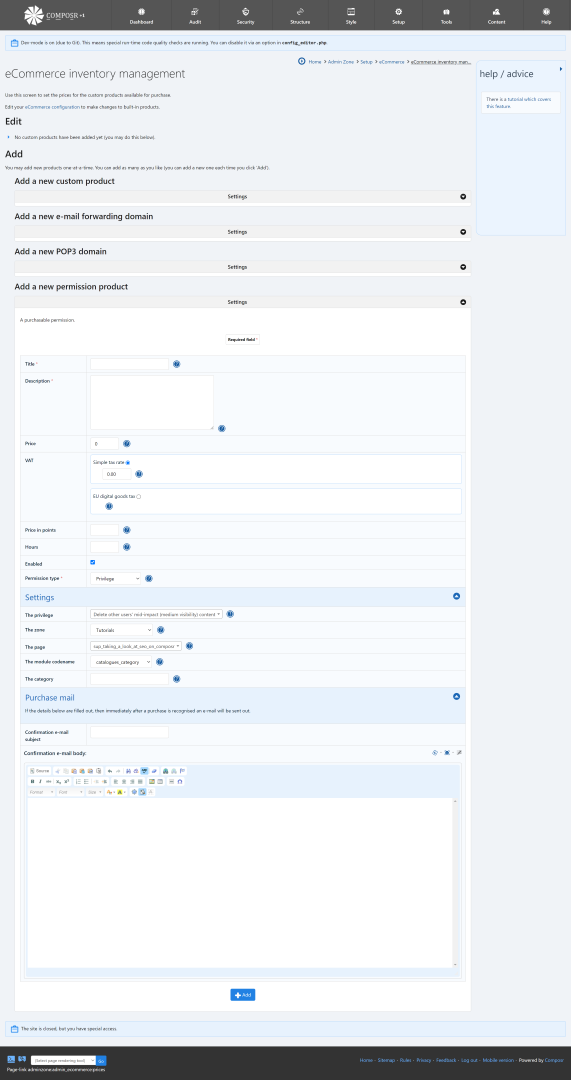
(Click to enlarge)
This is done via the inventory management screen at:
Admin Zone > Setup > eCommerce inventory management
The different types of permission (product) are configured with settings as follows:
Privilege
If a privilege is set globally, you will only set “The privilege”.If you are scoping it to a particular module page (e.g. “downloads”), you will also set “The page”.
If you are scoping it to a particular category, you will also set it to “The module codename” and “The category”.
Zone-access
You will only set “The zone”.Page-access
You will set “The zone” and “The page”.Category-access
You will set “The module codename” and “The category”.Normally “The category” will be a numeric ID.
This said, when you add or edit a category you can automatically set up the permission product on the normal form.
Categories that a user does not have permission to will not be linked. So to promote sale of access to those categories you may want to either direct users directly into the Purchasing module, or link to the sale pages from the description of the parent download category.
Download categories
Download category access is implemented as a special case. The contents of the download category will be e-mailed out directly upon purchase.This is great for selling things like eBooks and audio files.
You can configure the maximum file size for sent files. Files above this size will be omitted.
Externally hosted files will also be omitted.
Custom products
Configuring custom products via the inventory management screen
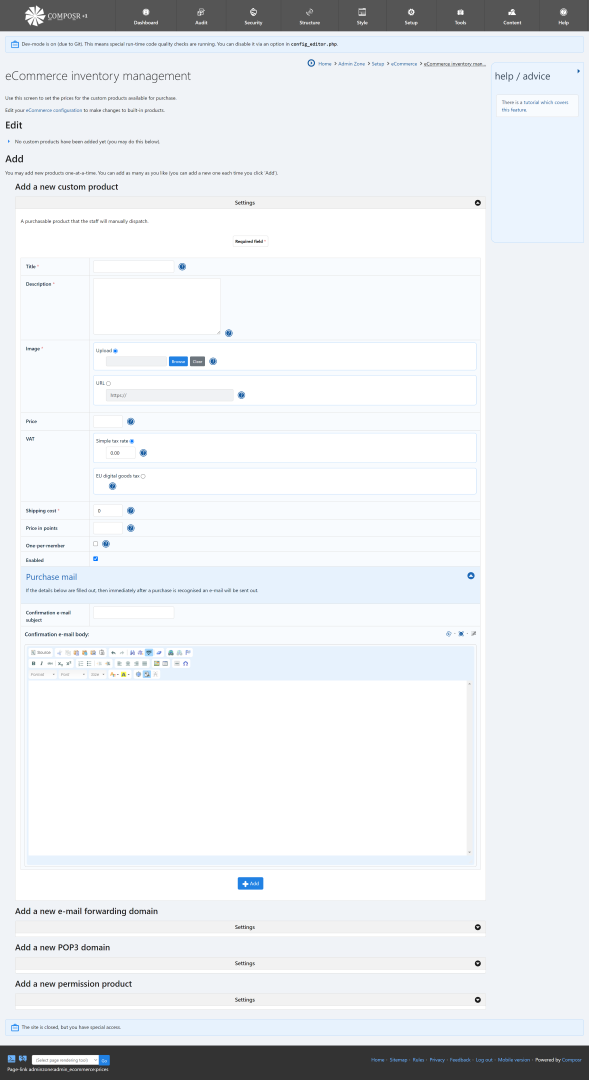
(Click to enlarge)
This is done via the inventory management screen at:
Admin Zone > Setup > eCommerce inventory management
E-mail accounts (advanced)
Configuring pop3 accounts via the inventory management screen
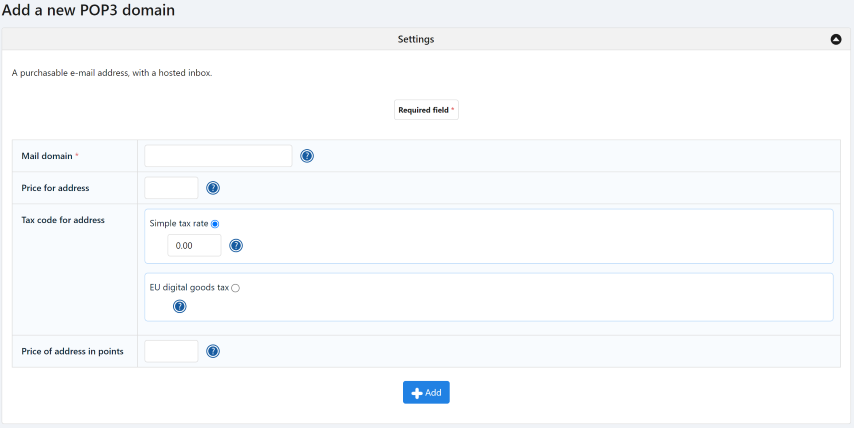
(Click to enlarge)
Configuring e-mail forwarders via the inventory management screen
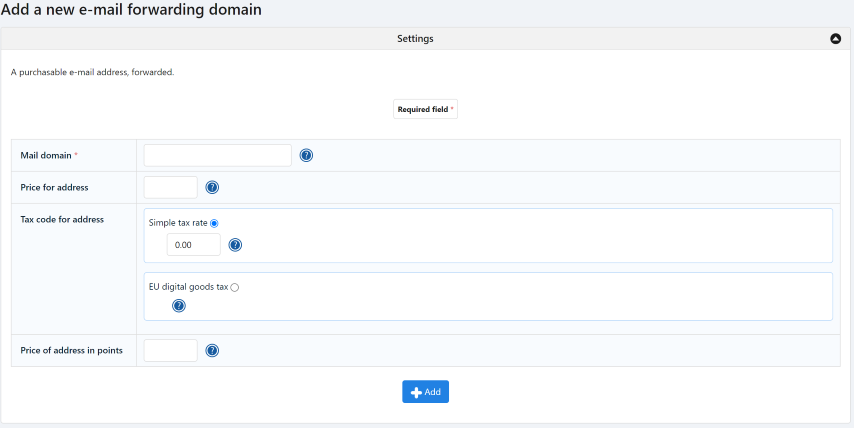
(Click to enlarge)
What may be purchased:
- POP3 e-mail accounts, and upgrades
- staff define which e-mail domains members may purchase addresses on
- staff must set up the e-mail accounts manually after they are purchased/upgrades
- e-mail Forwarding accounts, and updates
- staff define which e-mail domains members may purchase addresses on
- staff must set up the e-mail accounts manually after they are purchased/upgrades
These may be configured via the inventory management screen at:
Admin Zone > Setup > eCommerce inventory management
If e-mail accounts are sold Composr cannot create them itself. Instead, it has to send out e-mail notifications to the site staff address, which includes details of how to add them. The method of addition is different for different systems, so the eCommerce configuration defines 3 URLs that can be set according to your server.
Example URLs follow for different webhosting control-panel software (please note that these may not be up-to-date with newer versions of these control-panels)…
For Plesk users
The mail add address (POP3 and forwarding) is:For Ensim users
The POP3 add address is:The forwarding add address is:
For cPanel users
The POP3 add address is:The forwarding add address is:
The POP3 quota change address is:
Community billboard (non-bundled)
As of Composr 10, the community billboard is a non-bundled addon.The queue is accessed via the Staff Checklist on the Admin Zone dashboard. Note that the queue is not self-managed, you need to control which message is active, as they won't automatically rotate or expire. We mentioned above that the staff are automatically notified when a purchase is made, but actually this isn't the case for the community billboard.
Messages may be manually added in the Admin Zone (a link is on the dashboard checklist), but regular users will be purchasing them. When that happens, you are notified of the new message have been added.
Managing community billboard messages in the queue
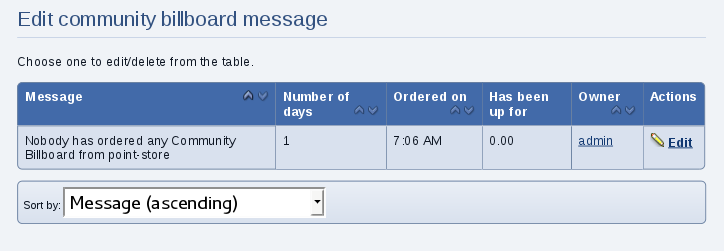
(Click to enlarge)
Adding a community billboard message from the Admin Zone
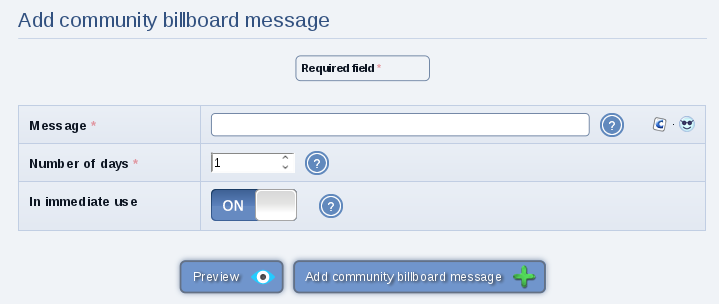
(Click to enlarge)
Configuring the default community billboard message

(Click to enlarge)
The community billboard message could be shown in the footer

(Click to enlarge)
Subscription products
Adding a capability for a usergroup subscription
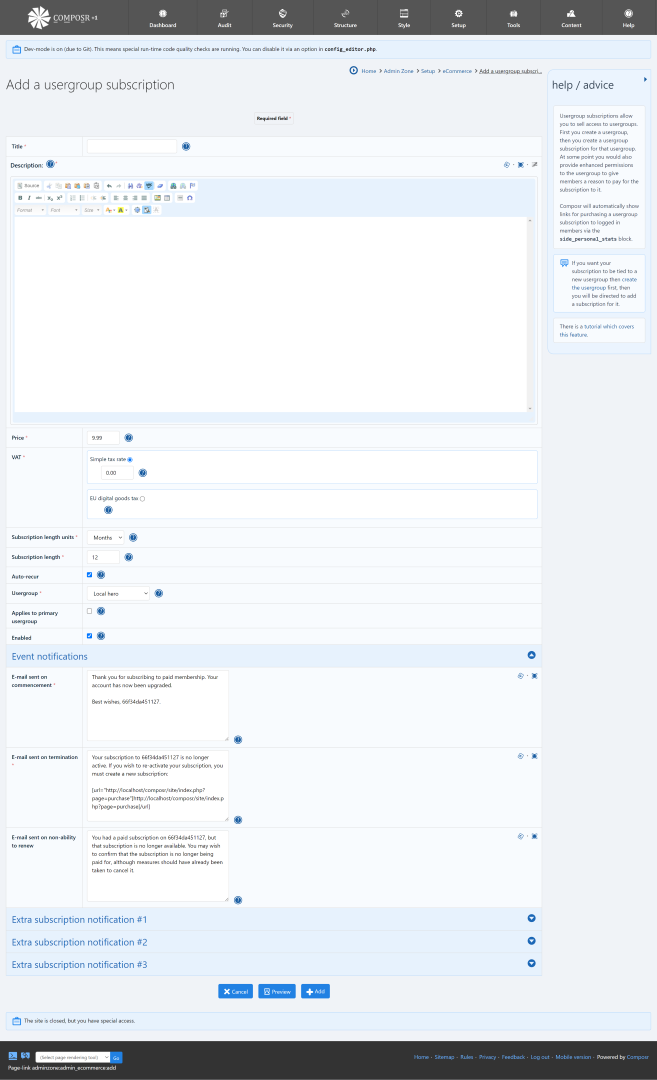
(Click to enlarge)
A link to the payment gateway to purchase.
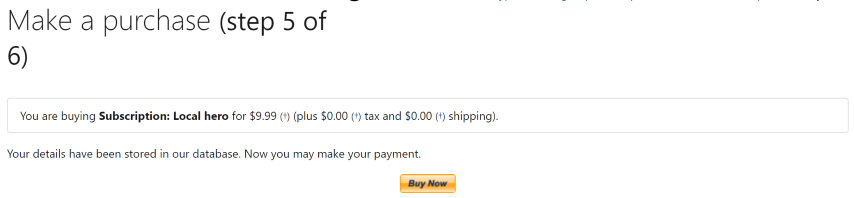
(Click to enlarge)
The description of the usergroup subscription is shown. You'd normally put a more extensive description here, explaining why someone should upgrade.

(Click to enlarge)
Link to upgrade via a usergroup subscription.
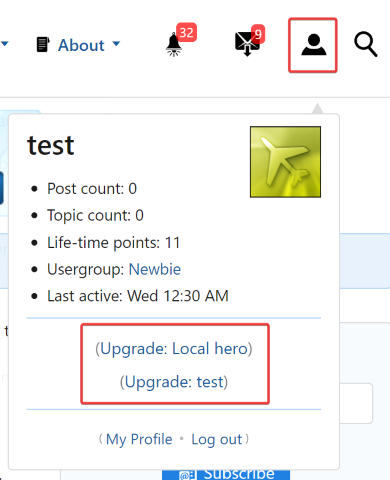
(Click to enlarge)
Usergroup subscriptions are implemented on top of subscriptions.
Usergroup subscriptions are only available if the forum system is Conversr.
Set up a usergroup description as follows:
- Add a usergroup that members will be able to subscribe to from Admin Zone > Security > Usergroups > Add usergroup. Make sure it is not 'Open membership', otherwise people could join it without paying.
- Assign additional access to this usergroup (or remove access from some of the other usergroups!).
- Go to Admin Zone > Setup > Usergroup subscription > Add usergroup subscription
- Fill in the form. Be aware that a '5' 'monthly' subscription means someone pays 'every 5 months'. It does not mean a subscription is paid every month and lasts for 5 months – subscriptions last indefinitely until the user chooses to cancel them.
- Provide a path for members to visit the purchase module so that they may activate their subscription, if one does not already exist (it does exist by default). By default this is possible via upgrade links shown in the logged-in box as per the above screenshot. You do also this via the purchase module (site:purchase page-link, Content > Purchasing on the default menus).
You can add as many usergroup subscriptions as you like, even multiple to the same usergroup. For example, [by adding more subscriptions] you could make it cheaper to subscribe yearly than monthly.
You can edit a usergroup subscription from:
Admin Zone > Setup > Usergroup subscription > Edit usergroup subscription
You can delete a usergroup subscription from the bottom of its edit form.
You can manually put someone into a subscription using a "Manual transaction". If you do so, it is up to you to manually expire members if they cease payments. You can do this from:
Admin Zone > Audit > eCommerce > View manual subscriptions
Note that for some payment gateways you need to be mindful about how subscription cancellation happens. At the time of writing only PayPal automatically cancels the subscription (and hence usergroup membership) within Composr once a subscription is remotely terminated. Some payment gateways can automatically cancel a subscription when a user locally requests it in Composr, and in such a case Composr will automatically cancel the subscription on its end too. So, unless you're using PayPal, if you get an e-mail from a payment gateway saying a subscription is terminated you should manually make sure the user is kicked out of the subscription usergroup within Composr.
Be very careful when deleting users because subscriptions will be left hanging when you do and would need to be manually cleaned up.
Invoice products
Invoicing a member
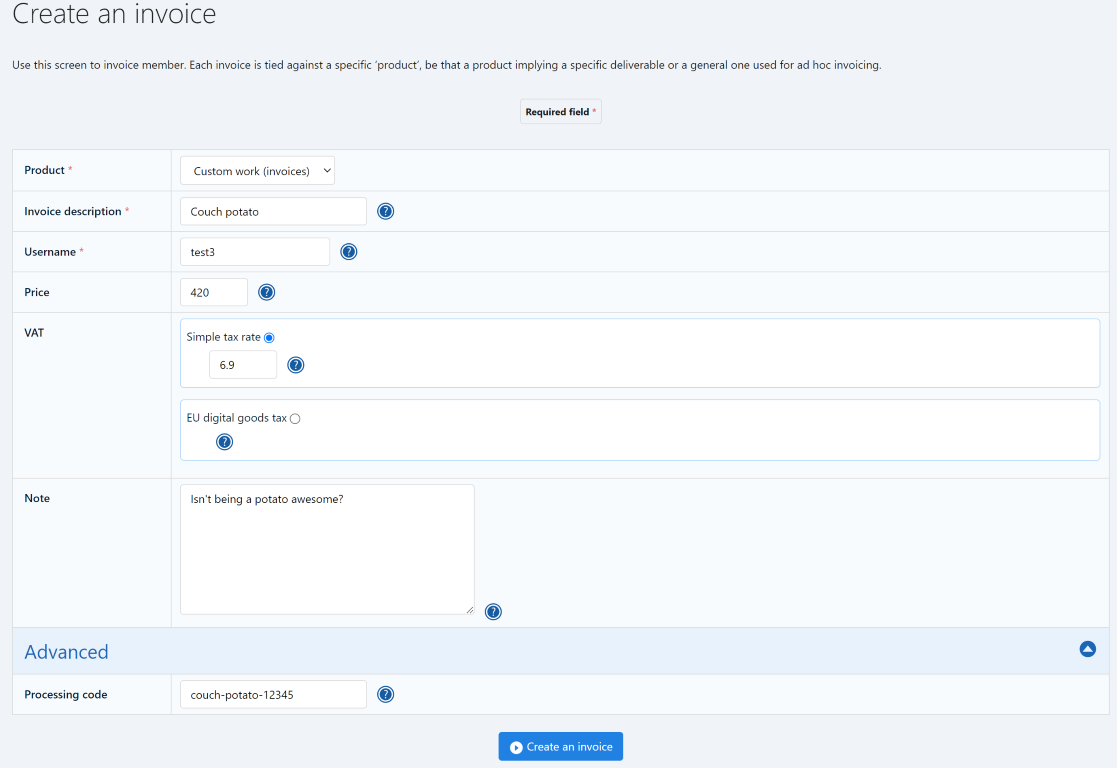
(Click to enlarge)
Members may view their invoicing history via links in their member profiles.
Staff may quickly locate unpaid invoices and invoices for which the work has not yet been fulfilled from:
Admin Zone > Audit > eCommerce > Invoices
Shopping catalogue items
The Composr shopping catalogue works via the existing Composr catalogues system. Out-of-the-box there is the shopping cart catalogue (called products), although you can have multiple.Shopping catalogues provide the following special functionality:
- special templating for tidy product display
- easy adding to the shopping cart
- tax calculation
- shipping cost calculation
- stock counting
The Composr shopping catalogue has intentionally been kept lightweight. We're not trying to compete with the dedicated eCommerce systems on features, we're trying to provide something with fantastic Composr integration and extendibility that meets the majority of peoples' needs. This way we are able to compete by providing eCommerce as a part of the full Composr package, rather than a standalone eCommerce system that is bloated in its own way but lacking the features needed for a wider website.
You can access the default products catalogue for modifications, and adding products to, from Admin Zone > Content > Products.
Product fields
Viewing a shopping catalogue item
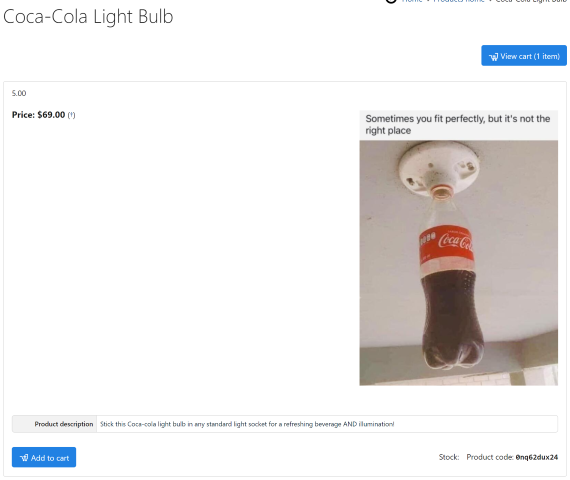
(Click to enlarge)
Adding a shopping catalogue item
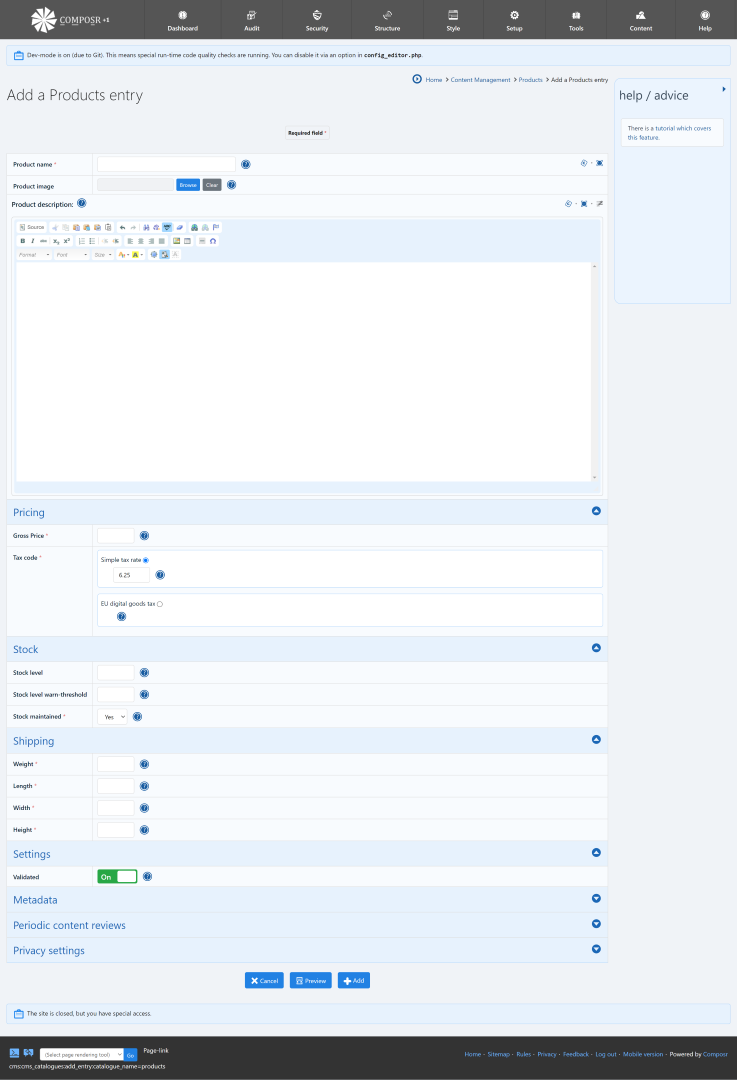
(Click to enlarge)
- Product name – the item's name
- Product code – a code of your choice for the item (a SKU, stock keeping code); by default this is hidden and randomly generated (you can edit the catalogue and remove RANDOM from the default field value if you want to enter it manually)
- Product image – a picture of the item
- Product description – a description of the item
- Pricing:
- Price – the item's price (pre-tax)
- Tax code – the tax code, selected using a Composr tax code selector (e.g. you can enter a percentage tax)
- Stock:
- Stock level – the number in stock
- Stock level warn-threshold – send out a notification to the staff if the stock goes below this level
- Stock maintained – whether stock will be maintained; if the stock is not maintained then users will not be able to purchase it if the stock runs out
- Shipping:
- Product weight – the item's weight, in the configured units
- Product length – the item's length, in the configured units
- Product width – the item's width, in the configured units
- Product height – the item's height, in the configured units
The fields are semantically tied into the system via the ecommerce_tag field option. If ecommerce_tag is not set then it will still try and match the fields using either the field types or the field names.
 You may add additional fields, such as extra product images or specifications. However do not delete any of the default fields. If an eCommerce catalogue is not correctly configured errors will occur.
Multiple shopping catalogues (advanced)
If you want another shopping catalogue then add a new catalogue with the Advanced "eCommerce catalogue" option set, and all the same tagged fields.Product options
A popular request is to be able to specify options when purchasing a product, such as size or colour.This would be a major task for us to implement, and complicate the system, so we are not currently planning to add it.
There are, however, three workarounds:
- Simply add the different product options as separate products.
- If you are using PayPal a template edit can be used to let the PayPal buy button carry through an option selection. We have left an example in the ECOM_CART_BUTTON_VIA_PAYPAL.tpl template. This workaround shifts the configuration burden over to being a template editing task, and shifts the administration burden onto PayPal's end.
- Just ask the user what they want by e-mail after they order.
If you need more flexibility than this (perhaps many different product options for different kinds of product, or options that affect the price), you should consider either sponsoring extended Composr development, or using a dedicated third-party eCommerce system.
Product reviews
By default the catalogue is configured to allow product reviews, but you may turn these off if you wish.Categories and entries (i.e. the contents of your product catalogue)
Once you are happy with your set of fields, you can add categories and entries to your catalogue. As this is exactly the same as adding entries to a normal catalogue, I'll refer you to the Custom structured content (via catalogues) tutorial.Deleting shopping cart items
Be aware that once ordered, a catalogue entry shouldn't usually be deleted. You can invalidate the entries instead (unselect 'Validated'), and/or move it into an archive category and/or set the stock to zero. This is vital to your ledger integrity. There is an option to forcibly purge an item from the database and all past order history for it, but it's not usually recommended.Shopping catalogue
Viewing the shopping cart
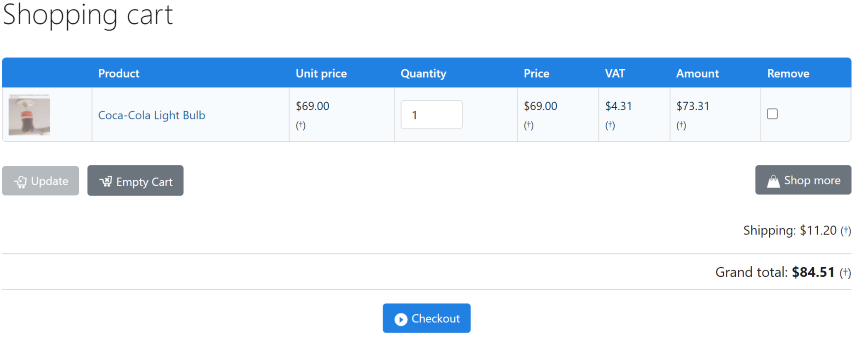
(Click to enlarge)
You may customise the appearance of the shopping catalogue in the usual way of editing catalogue templates (the products catalogue already has most of the templates overridden with eCommerce-tuned styles, so you do not need to worry about accidentally altering the look of non-eCommerce catalogues).
Guests
Guests may make purchases, if they have the necessary Composr permissions (to the catalogues module, the products catalogue, and the shopping module).Guest users have no member ID, so Composr will store the order against their 'session ID' instead. Session IDs work using cookies, secured against the user's IP address. The session can be lost in many circumstances:
- if the user has their browser set to empty cookies when closed
- after the session expiry time (the default for this is 1 hour, but it's a config option)
- if the user's IP address changes (router's can sometimes do this, or ISPs may expire them routinely)
- if the user switches web browsers or machines
We can't tie the purchases to IP addresses because often thousands of users can be on the same IP address.
If you think users may be making delayed purchases as guests, you may want to consider removing Guest permissions to the shopping module, to force logins.
Handling orders
When orders are purchased:- a notification is sent out to the staff so they can manage the order
- the stock level is adjusted.
The staff can follow a link in the notification to manage the order, or go manually to Audit > eCommerce > Shopping orders.
Options for managing the order include:
- Changing the order status (e.g. mark as dispatched)
- Adding a note to be sent to the buyer (e.g. providing a tracking URL)
Orders may be reviewed by the buyer from their shopping module (linked from their member profile)
Handling tax
Tax calculation has been kept as simple as reasonably possible because it's impossible to create configurability to cover every scenario people will need globally. Tax rules have too many special cases.To provide a reasonable level of support we have:
- Architected the calculations to go through tax hooks (systems/ecommerce_tax). Developers may expand on the functionality of the tax system by adding new tax hooks, say, to add support for another third party tax service.
- Included support for international taxation of many countries (though not all of them) by integration of the TaxJar web service.
- Included support for USA taxation across state/country/city lines by integration of the free TaxCloud web service.
- This allows support for 'nexuses'
- This allows support for destination taxation state rules
- Special support for EU digital goods taxation.
- Support for custom specification of which Countries and States taxation applies within.
A big limitation with using the software (in-built) tax system opposed to a third party tax service is that the in-built system cannot handle different taxes for different products (tax codes).
When defining tax codes ('tax code' is the term we use) you can select with either:
- a TaxJar (TJ) tax code
- a TaxCloud (TIC) tax code
- EU digital goods (which auto-selects the appropriate tax based on the buyer's country)
- your own custom percentage rate.
Known limitations and important considerations:
- You should not enable automatic tax deduction on your payment gateway as Composr handles it for you. If tax deduction was enabled then transactions would fail to go through due to mismatches in pricing.
- We cannot verify that a user has given their correct address when they pay, and hence know the correct tax to charge. However we believe tax authorities would generally recognise that such fraud is the fault of users rather than your own liability (this is standard practice), plus the address is also used for shipping which creates a reasonable barrier to fraud.
- Before a buyer's address is known taxation is calculated as if the buyer was buying from the business's own address. This is so we can provide a "best estimate" of tax as early as possible.
- We do not mention import duty in the software, which would often be due if shipping internationally. The buyer pays this to the shipping company before they will deliver the import. This is standard practice, and it is standard to not refer to it in eCommerce tax systems as it is outside the scope, but I thought it was worth mentioning.
- We have designed the tax system to be legally compliant with at least EU and USA rules, although we cannot guarantee this – you must take your own responsibility for your legal compliance.
- Sales tax rates may be changed, but they would be changed at the start of a new tax accounting period. Unless you are using a third-party tax service for all the taxes then you must be aware of this, ready to switch in new rates at midnight when the new ones apply.
- Avoid taking and holding multiple currencies (e.g. on PayPal) unless you have a very good reason to – it will make your accounting particularly complicated. It is better to just force the buyer's credit card to charge in your own currency.
- You should strongly consider setting the site timezone to that where you collect tax so that if tax rates change you can more easily tell what dates the transactions happened on.
Regional considerations
International Sales Tax
 If you are selling products commercially, you may be required to pay sales tax depending on where your business is located and where you are serving (shipping) your products. This can get extremely complex especially in the US.
You must use the third-party TaxJar or TaxCloud service to assist with complex sales tax calculations and management; the software only supports simple taxes.
To use the TaxJar system:
- Your site must have working SSL functionality (outbound)
- Set up an account on TaxJar
- Set up required details on TaxJar (shipping and billing details, business name, nexuses, etc); you will need your filing details such as your Federal Tax ID (EIN) if you plan to use TaxJar to file your taxes (not required)
- Set up your payment information in the TaxJar Plan & Billing tab
- Consider adding the "Sales Tax Policy" text to your Composr rules page
- Fill in the "TaxJar API key" configuration option (Admin Zone > Setup > Configuration > eCommerce options > TaxJar) on your Composr site
- Set all applicable Business address configuration options depending on your country
- Set the "Currency" configuration option on your Composr site to the currency your business uses
- Configure tax configuration options, and shopping catalogue items, to use the appropriate TaxJar code(s)
To use the TaxCloud system (only available for US businesses at the time of writing):
- Your site must have working SSL functionality (outbound)
- Set up an account on TaxCloud
- Set up required details on the TaxCloud Profile/Websites/Contacts/Locations tabs; you will need your filing details such as your Federal Tax ID (EIN)
- Set up your payment information in the TaxCloud Payment Information tabs
- Consider adding the "Sales Tax Policy" text to your Composr rules page
- Fill in the "TaxCloud API key" configuration option (Admin Zone > Setup > Configuration > eCommerce options > TaxCloud) on your Composr site
- Fill in the "TaxCloud API ID" configuration option on your Composr site
- Set the "Business country" configuration option on your Composr site to US
- Set the "Business state" configuration option on your Composr site to the state you operate your business from (make sure you enter a 2-character state code in upper case, not the full written state name)
- You may ignore the "Tax countries" configuration option and "Tax states" configuration option
- Set the "Currency" configuration option on your Composr site to USD
- Configure tax configuration options, and shopping catalogue items, to use the appropriate TIC code(s)
USA users
USA tax is extremely complex as it may be levied at the federal level, state level, county level, and city level. For most USA states the tax is charged based on where the buyer resides ("destination taxation"), not the seller ("origin taxation"). That is, unless the buyer is in a state where you don't have any operations centre (in which case no sales tax applies at all unless there's a federal tax which is rare †).All the taxes need to be individually tracked and paid out. It is necessary to use a third-party tax service like TaxJar or TaxCloud for this.
Known limitations at this time which could be worked around with custom code…
- We don't support exemption certificates for buyers not needing to pay tax (e.g. some farmers in some cases)
† Instead of sales tax charged at point of sale, most sites have something called 'use tax'. 'Use tax' should be paid by the buyer themselves when they file their taxes. Very few people do, make of that what you will.
EU users
Sales tax in the EU is known as "VAT". It is technically different from a normal sales tax, but we don't need to get into that in this tutorial. There is a configuration option to make sure that the term "VAT" is used instead of the term "Sales tax".Basically if you are selling products or services commercially, you must register with your government's tax office for VAT.
In the UK and some other countries there is an income threshold after which you need to register. If you don't you can't get rebate on purchases you make, but you also benefit competitively by being able to charge buyers less money. If you are selling digital goods then there is no threshold, you must collect VAT and remit it (e.g. via the "MOSS" if you are based in UK).
Known limitations at this time which could be worked around with custom code…
- EU VAT-registered buyers may not input a VAT number to disable VAT charging – they must use the government rebate process when they file tax returns (https://composr.app/ca…es/entry/tracker-3062.htm)
The EU system for calculating digital product taxes charges the tax rate of the buyer's country, not yours, and is then paid to the government in the buyer's country.
It only applies to certain digital sales, not shipped products. To use digital product tax:
- You may ignore the "Tax countries" configuration option and "Tax states" configuration option unless you sell other products that have other tax codes
- Configure tax configuration options, and shopping catalogue items, to use the "EU digital goods tax" tax code
Other users
Known limitations at this time which could be worked around with custom code…- No special consideration has been given for tax rules in any other particular jurisdiction – instead we have tried to make it configurable
Receipts
Receipts are automatically created and delivered to buyers through notifications. They are also available from the Admin Zone > Audit > eCommerce.Line items
Local laws may require receipts that show individual line items, each with their own tax rate. For example, shipping costs may be zero-rated, services may be given a service rate, and food may be given a food rate.We support line items for:
- shopping cart purchases: each individual item purchased is shown as a line item, as well as shipping costs.
- for all eCommerce products that support a defined shipping cost we support showing this as a separate line item.
We do not support inputting line items individually in the Composr invoice system. Composr invoices are designed for simple invoices with a common tax code covering the whole value of the invoice. You may workaround the limitation in 2 ways:
- by manually preparing your own invoices, using the Composr system for tracking and payment, but not for any kind of official records. The tax code produced would be custom-calculated as the effective percentage tax rate covering the overall invoice.
- create multiple invoices, so that you don't actually require separate line items
The same limitation applies to subscriptions, although this is not likely to be an issue as usually subscriptions wouldn't contain separate taxable items within them. The tax regulators would likely consider the subscription "atomic".
If you are setting up custom products it is possible these represent aggregate purchases and may suffer from this problem. However you likely could make a convincing case that it was all one "atomic" purchase also.
Tax derivation
The tax derivations will be needed for tax remittance if you are subject to EU digital goods tax, or to USA destination taxation.We generally track these and they are available when you do a spreadsheet download of transactions.
However, TaxCloud and TaxJar don't actually provide us broken-down data of the taxes. So if you are using those services you'll find this data on their website itself.
Shipping
Handling shipping costs
 You should not enable automatic shipping cost calculation on your payment gateway (e.g. PayPal) as Composr handles it for you. If shipping cost calculation was enabled, then buyers might either be double-charged for shipping or otherwise charged the wrong amount.
You have 3 possible approaches for calculating shipping costs:
- Use the inbuilt configuration options for calculating shipping cost based on weight and dimensions. This may work reasonably if shipping costs are not going to vary by distance.
- Fill in the Shippo configuration to calculate based on weight, dimensions, and presumably distance. Shippo will provide an exact shipping cost by actual communication with your choice of shipping company. This is likely your best option as Shippo is free (you pay when you print shipping labels), although it may not work for businesses in every country.
- Customise the code. The shipping cost calculation in '1' has been kept very simple because it's impossible to create configurability to cover every scenario people will want globally. There are too many different special cases to cover. We have therefore architected the calculations to go through a simple common function that a programmer can override to add in additional behaviour if needed, calculate_shipping_cost.
Known limitations at this time which could be worked around with custom code…
- There's no way to give a product a flat rate for shipping (https://composr.app/ca…es/entry/tracker-1520.htm)
- Free shipping above a certain payment amount is not supported (https://composr.app/tracker_issue/3064.htm)
- Customer-selectable shipping options are not supported (https://composr.app/tracker_issue/3065.htm)
Shippo
Shippo is free because they make money helping you print shipping labels. We don't currently provide any special integration with that feature though.- Sign up to Shippo
- Log into your Dashboard
- Go to the API section
- Copy the Live Token and Test Token into your eCommerce configuration (Admin Zone > Setup > Configuration > eCommerce options > Shipping).
- Go to the Carriers section
- Disable all but one carrier account (as Composr does not currently support shipping option choices); make sure the carrier account you leave supports international shipping (DHL Express does not, for example)
Shipping addresses
Some Custom Profile Fields are pre-installed to allow members to set their shipping address in their regular profile settings (instead of having to define it each time when they pay on the payment gateway).There are configuration options to define whether the fields are enabled, in Admin Zone > Setup > Configuration > User/usergroup options > Special CPFs to show. You will especially need to do this for county and state if applicable to your demographic.
Additionally by default these fields are not enabled for direct editing by users, so you would need to edit them to enable 'Owner viewable' and 'Owner settable' for each field.
You can find and edit the fields from:
Admin Zone > Setup > Custom Profile Fields > Edit Custom Profile Field
The configuration options also impact what shipping/billing address fields show, but subtly:
- County input:
- If the County field is disabled then County input will not be available
- State input:
- If the State field is disabled then State input will not be available, unless the Business country is US (as it is required for tax calculation)
- If the Business country is US then State input will be a drop-down list, otherwise it will be a free-text input
- If the Country field is enabled or the Business country is not US then an 'N/A' option will be included on the list (to signify a non-USA state)
- If a buyer's state selection is not appropriate for the country selection then an error message will be shown
- Postcode/Zip input:
- If the Postcode/Zip field is disabled then Postcode/Zip input will not be enabled, unless the Business country is US (as required for tax calculation)
- If a buyer's Postcode/Zip selection is not appropriate for the country selection then an error message will be shown
- Country input:
- If the Country field is disabled the Business country will be used automatically for the buyer's shipping/billing address
Auditing
Handling refunds
Sales list management
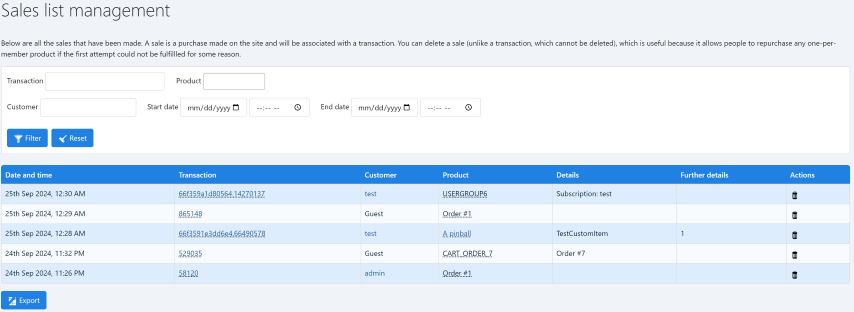
(Click to enlarge)
Admin Zone > Audit > eCommerce sales list management
The module should be used to cancel purchases, such as an e-mail address purchased up a user that is no longer valid. Cancelling such a purchase allows a re-purchase at a later date (only one address of each e-mail address type is allowed per-user).
You may also want to cancel whatever the purchase automatically did. This is not done automatically for you (†). For example, if a user bought name highlighting you can edit their account to un-highlight their name.
Cancelling does not automatically provide a refund.
For monetary payments:
Refunds should be done on the payment gateway.
For point payments:
Refunds must manually be given through the points system.
† Usergroup subscriptions can be cancelled from the subscriptions page, or from some payment gateways. Usergroup memberships automatically are removed when a subscription is terminated.
Charts
A profit/loss account for a fresh install
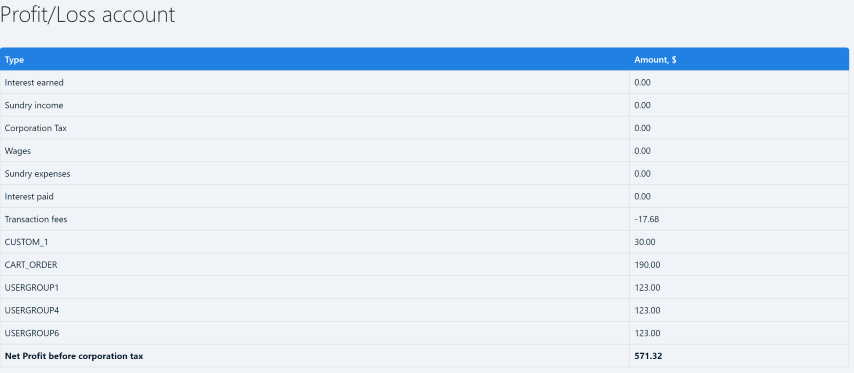
(Click to enlarge)
Composr can generate the following charts over a custom specified period:
- Profit and loss account (Admin Zone > Audit > eCommerce > Profit/Loss account)
- Cash flow diagram (Admin Zone > Audit > eCommerce > Cash flow diagram)
Not for formal accounting purposes
The developers do not accept any responsibility for the financial accounts of users of the Composr eCommerce system. Accountancy features are provided as an aid only and are not guaranteed to perform to match any legislative, tax, or accountancy conventions. Furthermore, the eCommerce system was only designed to handle transactions going through the website and not ones that take place elsewhere (e.g. refunds, direct payments).
Logs
Transaction logs can be viewed from:Admin Zone > Audit > eCommerce > Logs
Payment gateways: advanced
Manual transactions
Inputting a manual transaction
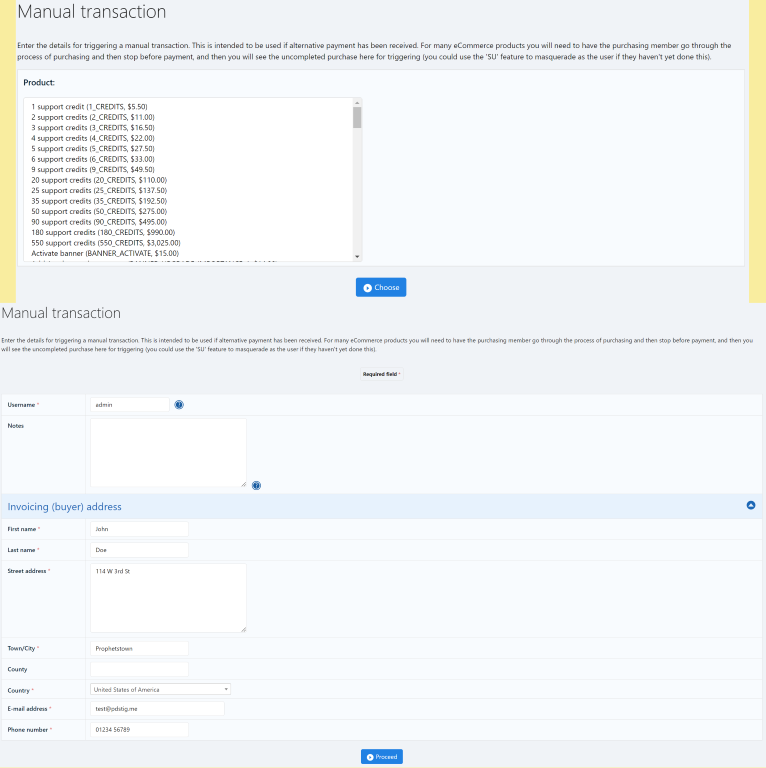
(Click to enlarge)
However, we've designed it to be modular. In Composr another method of doing a transaction is the 'manual transaction'. The manual transaction form just allows you to simulate a transaction from the Admin Zone; the idea is that you've received a cheque (or SMS payment, or whatever) and are manually telling Composr about it so that Composr can dispatch the sale. To perform a manual transaction you need to:
- access the manual transaction screen (Admin Zone > Audit > eCommerce > Manual transaction).
- select the right product
- enter the correct ID number that the product will use to dispatch for this sale
- enter the sale amount that the product expects to be receiving (which you can leave blank for it to work this out itself).
Manual transactions may also be used to input transactions that are totally external to Composr, and thus otherwise immeasurable by the charting. For example, an organisations expenditure may be recorded by manually inputting a negative transaction for the special 'Other' product.
Local payments
Composr supports taking in payments 'locally' (i.e. not redirecting to a third-party site to take the payment). Not all the payment gateways within Composr allow local payments though, either due to the gateways not supporting it or just because it has not yet been implemented. At the time of writing the Authorize.Net gateway supports it.Local payments should be considered with great caution because it requires a high level of PCI compliance, a very complex and expensive (increasingly so) process that carries legal liability.
You will need a more expensive webhost that provides PCI compliance.
We have summarised the PCI compliance rules below in a way streamlined toward Composr. This summary is not a full representation of PCI compliance and you should read through everything yourself.
| Headline | Rule | Applies to webhost | Applies to website |
|---|---|---|---|
| Hardware firewall | Have a hardware firewall that sits in front of all inbound traffic. Every protocol allowed through the firewall must have a strict justification. The webhost must maintain full schematic documentation around the firewall, including all possible data flows. Everything must be reviewed every 6 months. | Yes | No |
| Software firewall | Any computer used to connect to the webhosting must have a software firewall enabled (e.g. the ones that come with Windows and Mac OS). | Yes | Yes |
| Antivirus | Your webhosting servers, and any computer used to connect to the webhosting, must have anti-virus software enabled. This must be kept updated, do periodic scans and keep logs which are retained. | Yes | Yes |
| Penetration testing | A PCI-approved scanning vendor must perform quarterly penetration testing on the network, repeating it until it passes. | Yes | No |
| Intrusion detection (1) | Run fully-updated intrusion detection systems; any attacks or failures recorded and reported to management in a timely manner. Run a change detection system on core operating system files at least weekly. | Yes | No |
| Intrusion detection (2) | Enable "Hacker/bot detected" notifications on an active administrator account in Composr. Run the rootkit_detector addon at least weekly. | No | Yes |
| Accurate logging | Normal system logging must be fully enabled, not tampered with, and kept for at least a year. The last 3 months of logging must be immediately available. The system clock must be synched to an online source. | Yes | Yes |
| Active security auditing | Logs must be reviewed daily and any attacks or failures recorded and reported to management in a timely manner. | Yes | Yes |
| Limit access | Only people needing the access may be given it to the extent that they need that access. | Yes | Yes |
| Separate accounts | Each user must have their own account. | Yes | Yes |
| No default access | No default passwords or unnecessary privileged default accounts may be in place. | Yes | No |
| Disable inactive accounts | Inactive accounts must be disabled after 90 days using the Composr "Password expiry days" configuration option. | No | Yes |
| Stay patched | Maintain an inventory of all relevant hardware and software items. Assess the security of each item. Keep all items patched for vulnerabilities, preferably via automatic nightly updates. Discard or replace anything that cannot be patched. | Yes | Yes |
| Secure shared hosting | If using shared hosting then webhosting accounts must be fully isolated from each other, using a suEXEC-style system. This is basic and already recommended under our webhosting recommendations. Additionally consideration needs to be given to ensure log files are both maintained and isolated. | Yes | No |
| VPN | Low level access to the webhosting (e.g. an SSH shell, phpMyAdmin, or a webhosting control panel) must require a VPN involving a secure key as well as the regular passwords. Each individual accessing user must have their own secure key. | Yes | No |
| Two-factor-authentication | Within Composr the "Enquire on new IPs" option must be enabled on any administrative usergroups. All administrative users must understand why this is the case via a documented policy. | No | Yes |
| Database isolation | The web server and MySQL server must be different machines [this actually comes from PA DSS]. | Yes | No |
| Physical security | The physical facilities must be kept secure with access control, ID badges, and video cameras. Sensitive areas in the facility must only be accessible to those that need it. The webhost must immediately revoke access for terminated employees or visitors leaving. Visitors must be audited in a log book (saying visitor name, company, and authorising employee). This book must be kept for at least 3 months. | Yes | No |
| Secure backups | All physical backup media must be kept securely, strongly encrypted, access-limited, and destroyed when no longer needed. | Yes | Yes |
| No wifi | Look for, and maintain an inventory of, any wifi networks connected to the webhosting network, on a quarterly basis. Any unauthorised networks must be recorded and reported to management in a timely manner. | Yes | No |
| SSL | Use an SSL certificate for at least access to the purchase, shopping, invoices, members, join and login modules. Preferably just use an HTTPS base URL. | No | Yes |
| Avoid storing card data | Only enable the "Store credit card numbers" configuration option (Admin Zone > Setup > Configuration > eCommerce options > General) if it is important to your business. | No | Yes |
| Screen developers | Ensure any developers hired are highly competent at secure coding. | No | Yes |
| Information Security Policy | Maintain an Information Security Policy. This must be in writing, cover all aspects of PCI compliance, kept updated, disseminated across staff, reviewed at least yearly, and compliance checked at least quarterly. It should include risk assessments, usage policies. There needs to be a process for initiating a timely forensic investigation in the case of a breach. | Yes | Yes |
| Screen staff | Staff should be screened for criminal records, credit history, and employment history. | Yes | Yes |
Concepts
- PayPal
- The most popular online payment gateway
- Payment gateway
- A third-party infrastructure for performing eCommerce transactions
- Instant Payment Notification
- A system, originally created by PayPal, for determining the progress of a financial transaction or ongoing subscription.
- Product
- An item in the eCommerce system that defines everything relating to the natural view of a product or service, including handling of any actions associated with a sale being completed or retracted; these products are not like supermarket products – they are very aggrandised and dynamic
- PCI
- The trade body for regulating eCommerce standards. When we refer to PCI compliance we are typically referring to PCI Data Security Standard (PCI DSS).
- Shopping catalogue
- A special catalogue for listing items that may be purchased through the shopping cart
- Shopping catalogue item
- An individual item in a shopping catalogue, another name for a catalogue entry which only applies to a shopping catalogue
- Shopping cart
- System for collecting and paying for one of more items from a shopping catalogue; typically these will be physical items that are shipped together
- Purchasing module
- The purchase module where one-off purchases are made
- Transaction
- A low-level record that an action took place (e.g. purchase, payment, or subscription change) in the eCommerce system
- Sale
- The act of something in the store being sold / purchased
- Subscription
- Something purchased that has recurring payments for as long as the subscription is open
- Order
- A record of one or more items purchased by a member. The order also has a status associated with it describing whether it was paid and delivered / fulfilled.
- Invoice
- A record submitted in the system for the member to pay
- Unit price
- The price of an item (gross, i.e. pre-tax), before quantity multiplication is applied
- Price
- The price of an item(s) (gross, i.e. pre-tax); this term is used roughly
- Amount
- The amount being paid in a transaction; this term is used roughly and may or may not include the sales tax
- Grand total
- The total cost of an order including tax and shipping costs
- Fee
- A fee levied on your website for processing a transaction
- Origin taxation
- USA taxation where taxes are levied based on where the seller (you) resides
- Destination taxation
- USA taxation where taxes are levied based on where the buyer resides
- Sales tax
- The system for charging tax on sales, used in the USA and other countries
- Use tax
- The system for paying tax on purchases, used in the USA; buyers are meant to report purchases from other states they paid no tax on and pay those taxes
- VAT
- Alternative to a sales tax system, used in the EU and some other countries around the world
- Tax code
- The Composr term for identifying a particular kind of taxation to apply to a product
- Tax derivation
- The Composr term for tracking what exact taxes are levied for a transaction
- EU digital goods taxation
- A tax system in Europe that applies to digital sales, taxes are paid to the buyer's home country using that country's own tax rate
- Receipt
- A formal (legally-compliant) document showing exactly what was paid for a transaction, broken down by line-item, with individual taxation rates shown for each line-item
- Customer
- The member who purchased the product
- Related member
- The member to whom a product applies (e.g. for a usergroup subscription, the member who was subscribed to the usergroup)
- TaxCloud
- A third-party web service for handling the complexities and filing of USA taxation
- TaxJar
- A third-party web service for handling the complexities of taxation in many international countries
- IPN
- Instant Payment Notification; when a payment is completed on a third party gateway (such as PayPal), the gateway will make a web request back to your Composr website (via /data/ecommerce.php) containing information about the transaction and its payment status. IPN is set up by default in Composr. Note that IPN can only work if your site is publicly accessible; development environments (such as ones running on localhost) may be inaccessible via IPN by gateways.
- PDT
- Payment Data Transfer; specific to PayPal, when a member completes payment on PayPal and is redirected by PayPal back to your Composr site, PayPal includes transaction information in the redirect so Composr can immediately confirm the transaction and its payment status (unlike IPN where Composr must wait for the gateway to send an IPN request through /data/ecommerce.php). PDT must be set up in PayPal and in Composr to use it. See Specific gateway notes > PayPal.
See also
- Custom structured content (via catalogues)
- Tools for subsites and subcommunities
- Legal and social responsibilities
- Creating an economy/reward-system for members via points
Feedback
Have a suggestion? Report an issue on the tracker.