Composr Supplementary: Setup a New Usergroup in Composr
Written by Steve Jarvis, Sponsored by Arvixe hosting
Potentially Outdated Tutorial
This supplementary tutorial might be outdated as it was written for a previous version of Composr CMS (version 10).
Usergroup form (1)
Creating a new usergroup in Composr, a step by step process
- Go to the Admin Zone
- Navigate to the Tools Section of the Admin Zone menu
- Choose the Members icon
- Choose the Usergroups icon (this can also be found under the Security section of the Admin Zone menu)
- Click Add Usergroup
- Fill in the form, take care to make sure you fill in all of the sections correctly
- Click the Add usergroup button
The Add usergroup form in detail
I thought it would be useful to go through the adding a usergroup form in a little detail explaining the different options that you have in this section. The form is split into several sections with each one having a different set of options.The first box is quite straightforward and is the name of the new usergroup. The next section is titled Advanced and has three options.
- Title – If you fill in this box then the user will display this as their title if this is their primary usergroup and they have not set their own custom title.
- Usergroup Leader – This option allows you to set someone to be able to add and remove members from the group. This option is useful if you have a site with a lot of users and you want to give a trusted member some responsibilities without making them a full administrator.
- Order – this is the order that the usergroup will appear in any list of usergroups. The usergroup which is set as number 1 appears first.
Joining section
This section has three quite important options in some circumstances. These options are:- Initial primary usergroup – this option basically means that if a new person joins your site then this will be their primary usergroup. You may choose to use this if you created new members group for example which may have reduced capabilities or need to have posts manually verified by a moderator at first until you are sure they are real member and not a spammer for example.
- Automatic secondary group – similar to the first option but adds new members as members of this group but as a secondary usergroup alongside their primary group.
- Open Membership – This is whether anyone can join the usergroup or whether they have to apply to join. If you are creating a members group for subscription payers you will not want to tick (check) this option.
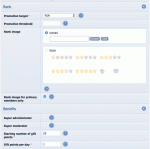
Rank
Usergroup form (2)
Benefits
The Benefits section of the usergroup form allows you to set whether the usergroup is classed as a super-administrator which has access to everything. This section also has an option to set usergroup members as super-moderators which means you will give the usergroup some moderator abilities and they will appear on the staff section of the website.Security
Usergroup form (3)
Restrictions
In this section you have 5 options which you can set for the user. These options include:- The maximum number of attachments the user can add to any post
- The maximum amount of data a user can upload in megabytes
- The maximum width and height in pixels the users avatar can be
- The maximum number of characters a user can use in a post
Flood Control
Usergroup form (4)
Actions
The final section allows you to copy all of the members from one existing users group to this new usergroup and you can also choose to copy the permissions from an existing usergroup. The second option is if you want to create a new members group which has just a few differences to another usergroup but the other usergroup needs to stay as it is.Feedback
Please rate this tutorial:
Have a suggestion? Report an issue on the tracker.


